• Increase the separation between the equipment and receiver.
• Consult the dealer or an experienced radio/TV technician for
FCC radiation exposure statement
This equipment complies with FCC radiation exposure limits set
forth for an uncontrolled environment. End users must follow the
specic operating instructions for satisfying RF exposure compli -
ance. To maintain compliance with FCC RF exposure compliance
requirements, please follow operation instructions as document-
ed in this manual. This transmitter must not be co-located or
operating in conjunction with any other antenna or transmitter.
This equipment should be installed and operated with a minimum
distance of 20cm between the radiator and your body. The avail-
ability of some specic channels and/or operational frequency
bands are country dependent and are rmware programmed at
the factory to match the intended destination. The rmware set -
ting is not accessible by the end user.
• A smartphone or tablet running on iOS 8.0/Android 4.3
• A 2.4GHz WiFi connection (supports 802.11b/g/n
The smart outlet is compatible with electrical appliances that use
10A current. Connecting an appliance that uses more than 10A
current may cause the outlet fuse to blow.
Product Requirements
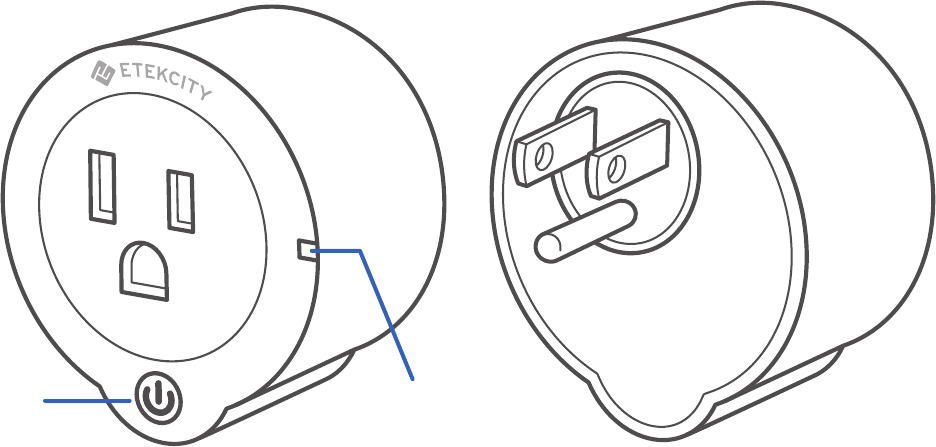
Front Back
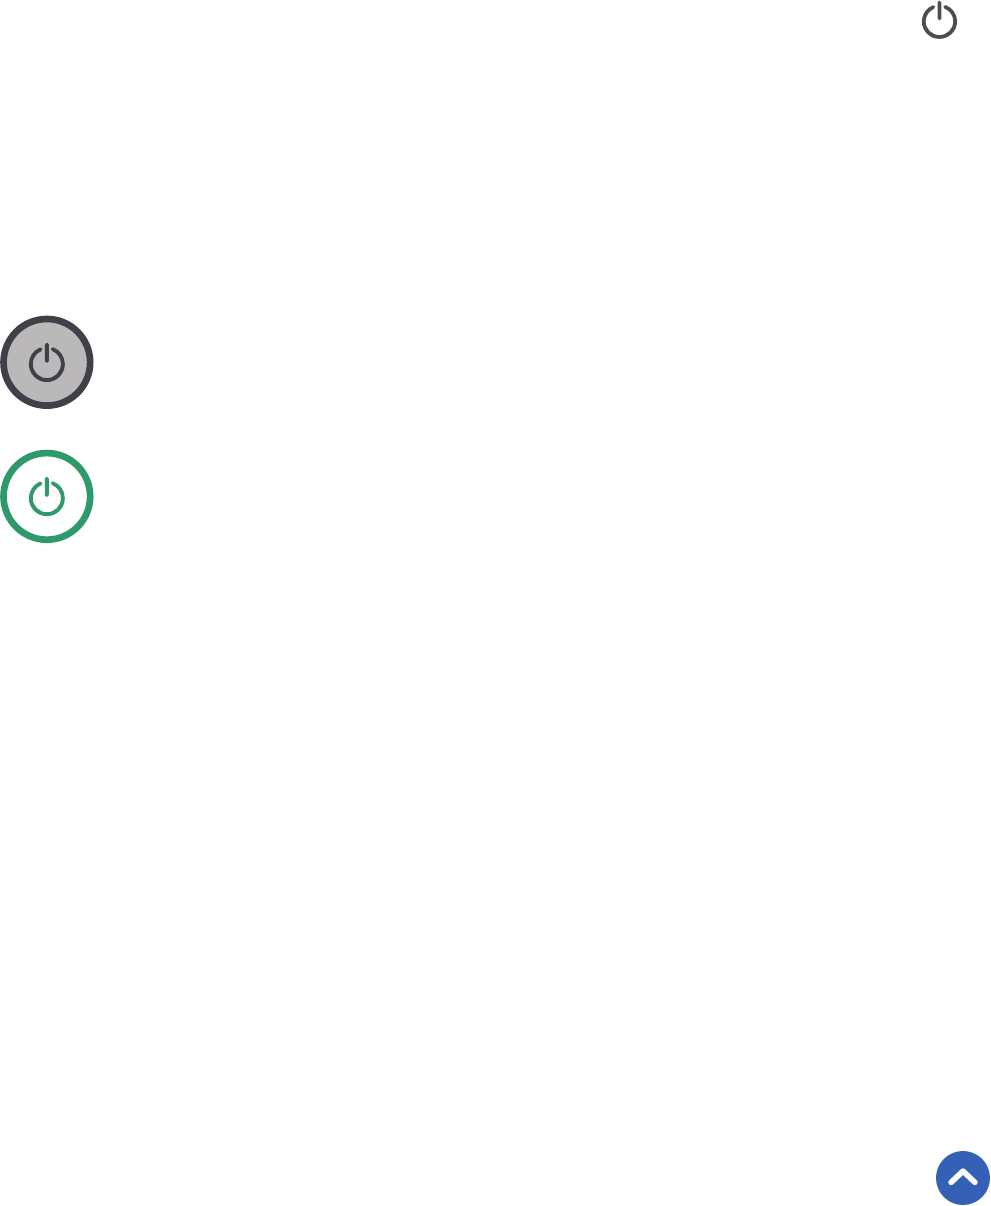
1. Power Button
2. LED Indicator
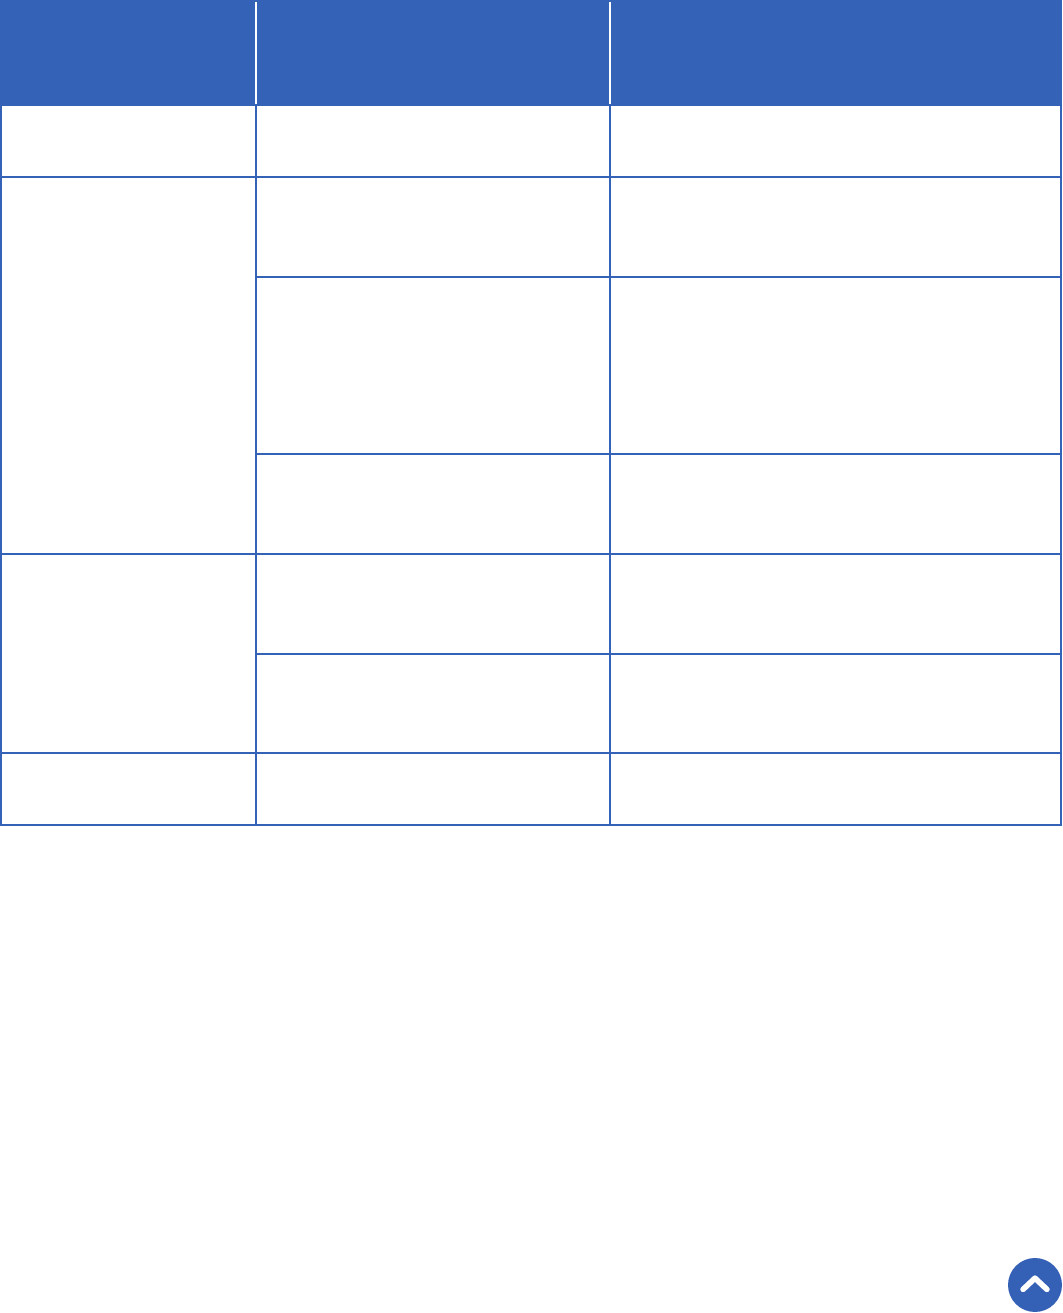
Light Indicator Chart
Color Status Description
Yellow Solid Outlet is turned on
Solid Outlet is in Smart
Conguration Mode
Slow blinking
Outlet is in APN
Conguration Mode / Outlet
has gone ofine after being
Blinks quickly, then
turns off Outlet was hard reset
Solid Outlet is in Smart
Conguration Mode
Alternating purple
and yellow
Outlet is in APN
Conguration Mode
None No light Outlet is off
Back to Table of Contents

VeSync App Setup
1. Connect your mobile device to a 2.4GHz WiFi network.
Note: The smart outlet will only s et up on a 2.4GHz net work.
Note: F or Andr oid user s, y ou mus t select “ Allo w” t o us e
Note: Y ou must cr eat e y our o wn V eS ync acc ount t o us e thir d-
part y servic e s and pr oducts , such as the Amaz on® E cho™,
Google Home™, and IFTTT™. The gue st ac c ount will not w ork
f or this. W ith a V eS ync acc ount , y ou c an also allo w y our
f amily or friends to c ontr ol y our smar t outlet .
2. Scan the QR code or download the VeSync app from the App
Store® or the Google Play™ store.
3. Open the VeSync app. Tap Sign Up to create a new account.
4. After you’ve signed up, enter your email and password, then
tap Log In .
Note: The V eS ync app and IFTTT app us er int erf aces ma y appear
slightly dif f er ent.
Available on th e
Google Play
Conguration
Smart Conguration Mode
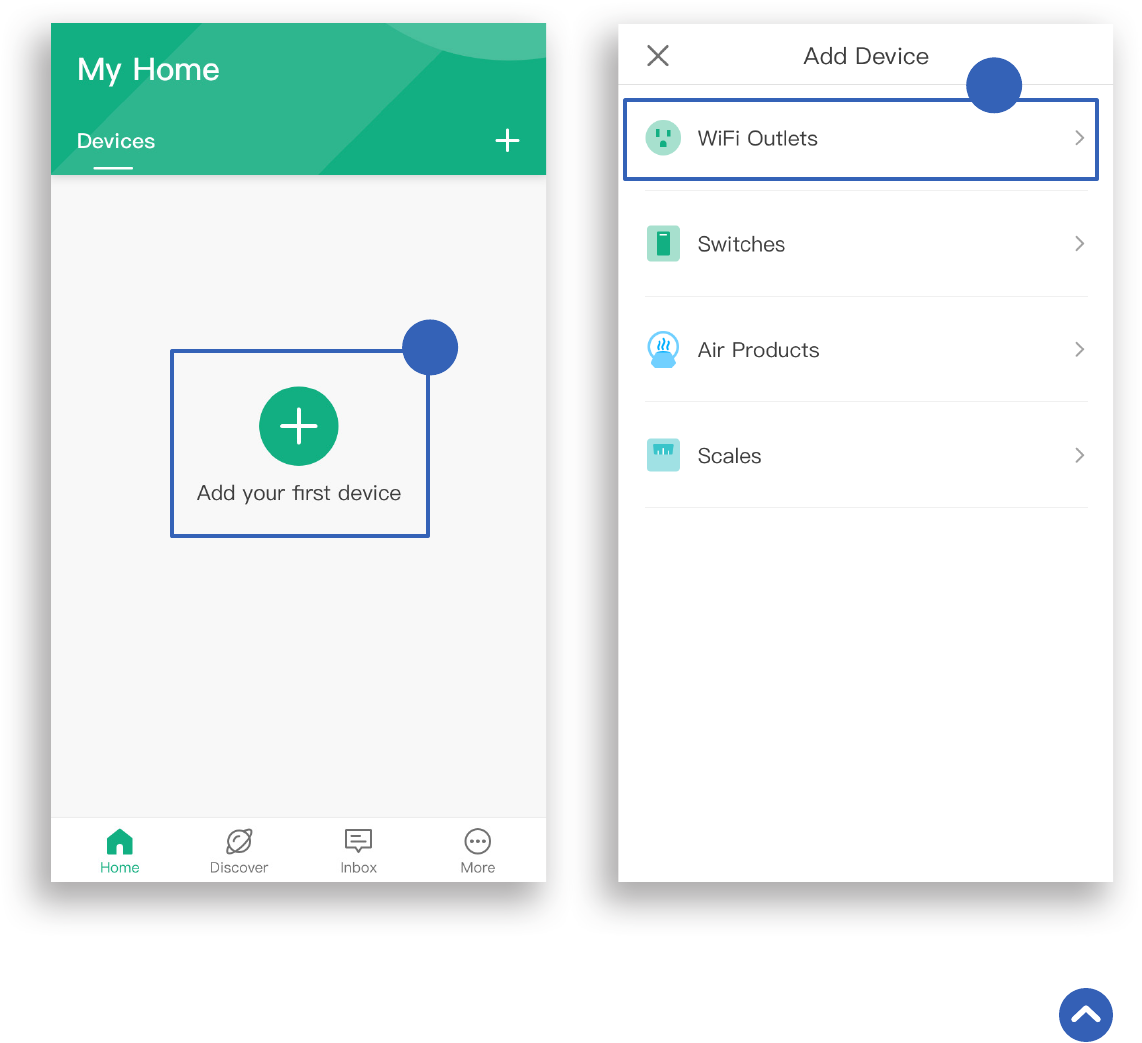
1. Tap the + button to add your smart outlet.
2. Tap WiFi Outlets .
Back to Table of Contents
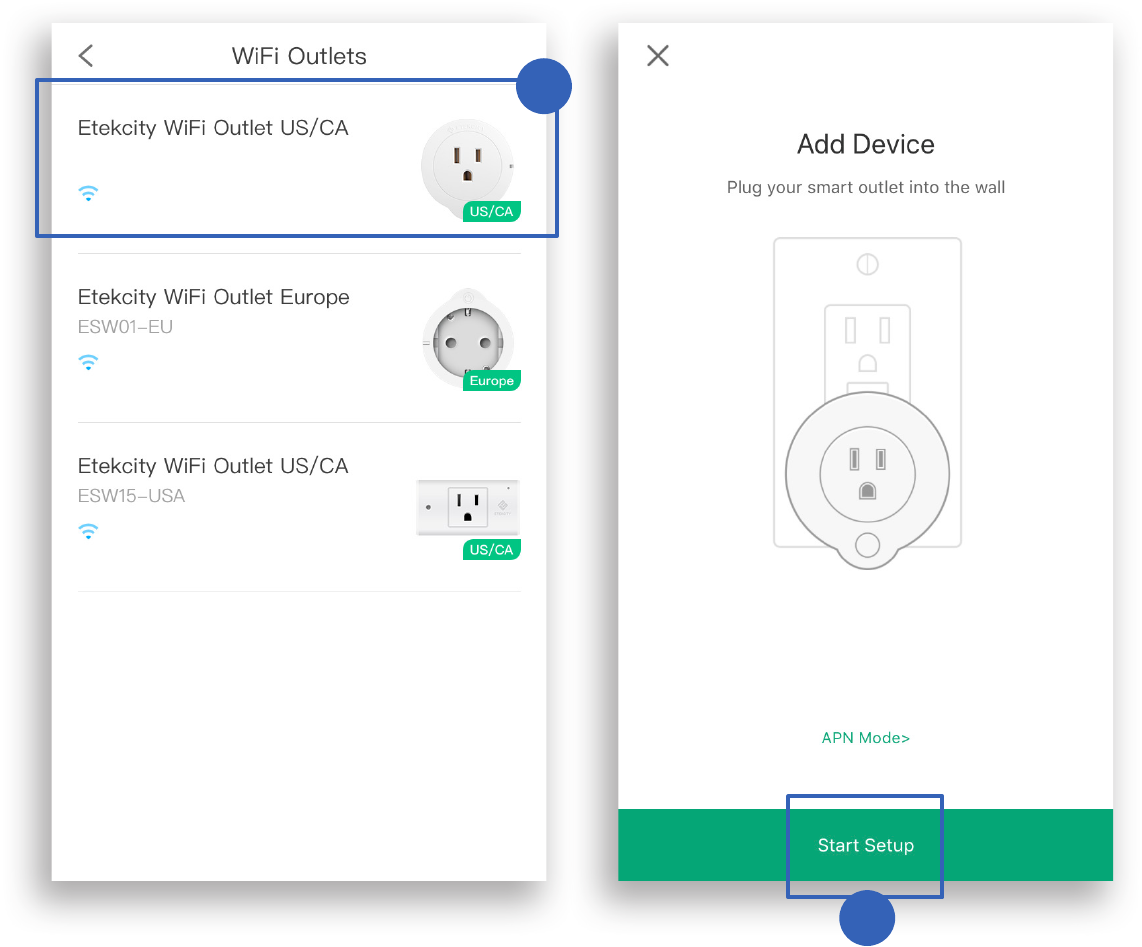
3. Tap Etekcity WiFi Outlet US/CA .
4. Tap Start Setup .
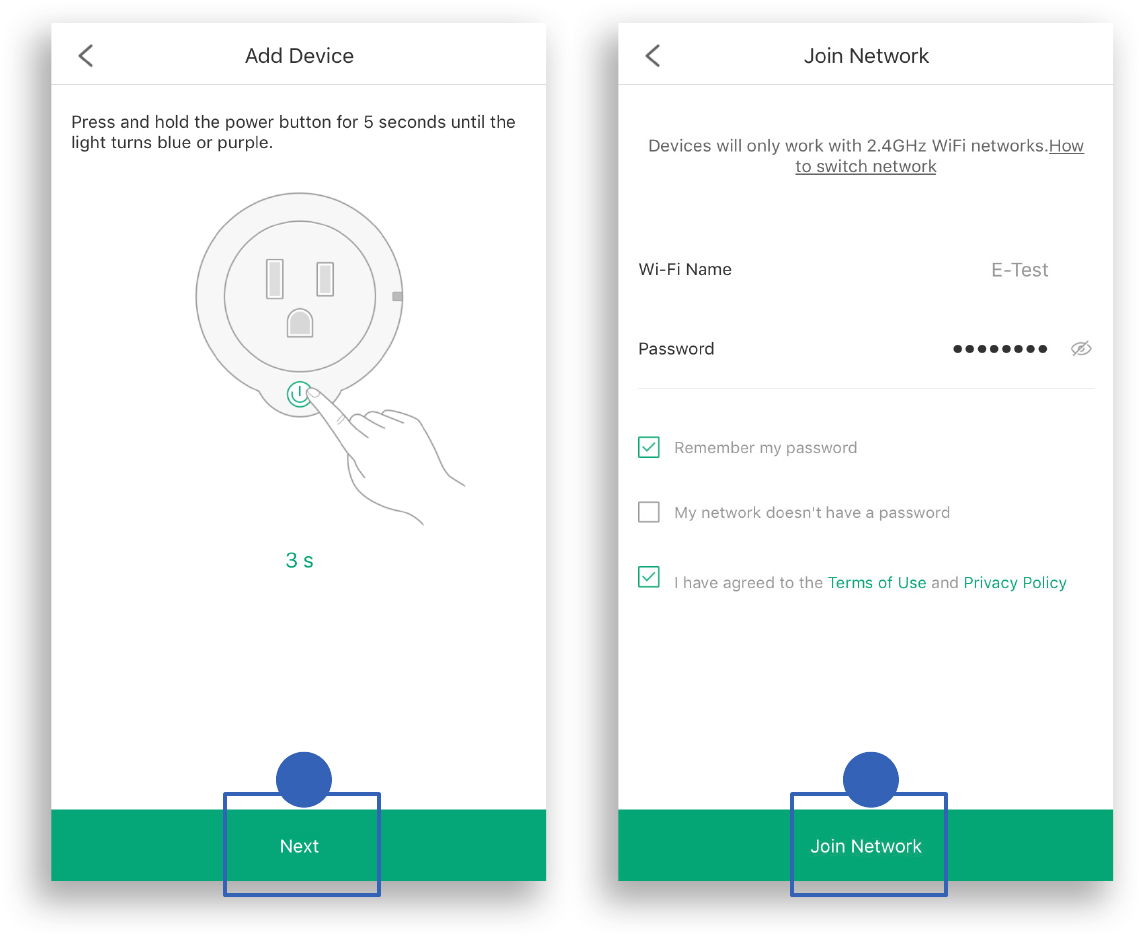
5. Press and hold the power button for 5 seconds, until
the WiFi indicator lights solid blue. This will put your
smart outlet into Smart Conguration Mode .
Then tap Next .
Note: Smart Con figur ation Mode will turn o ff aft er 5 minut e s.
6. Type in the name of your home WiFi network and
password, then tap Join Network .
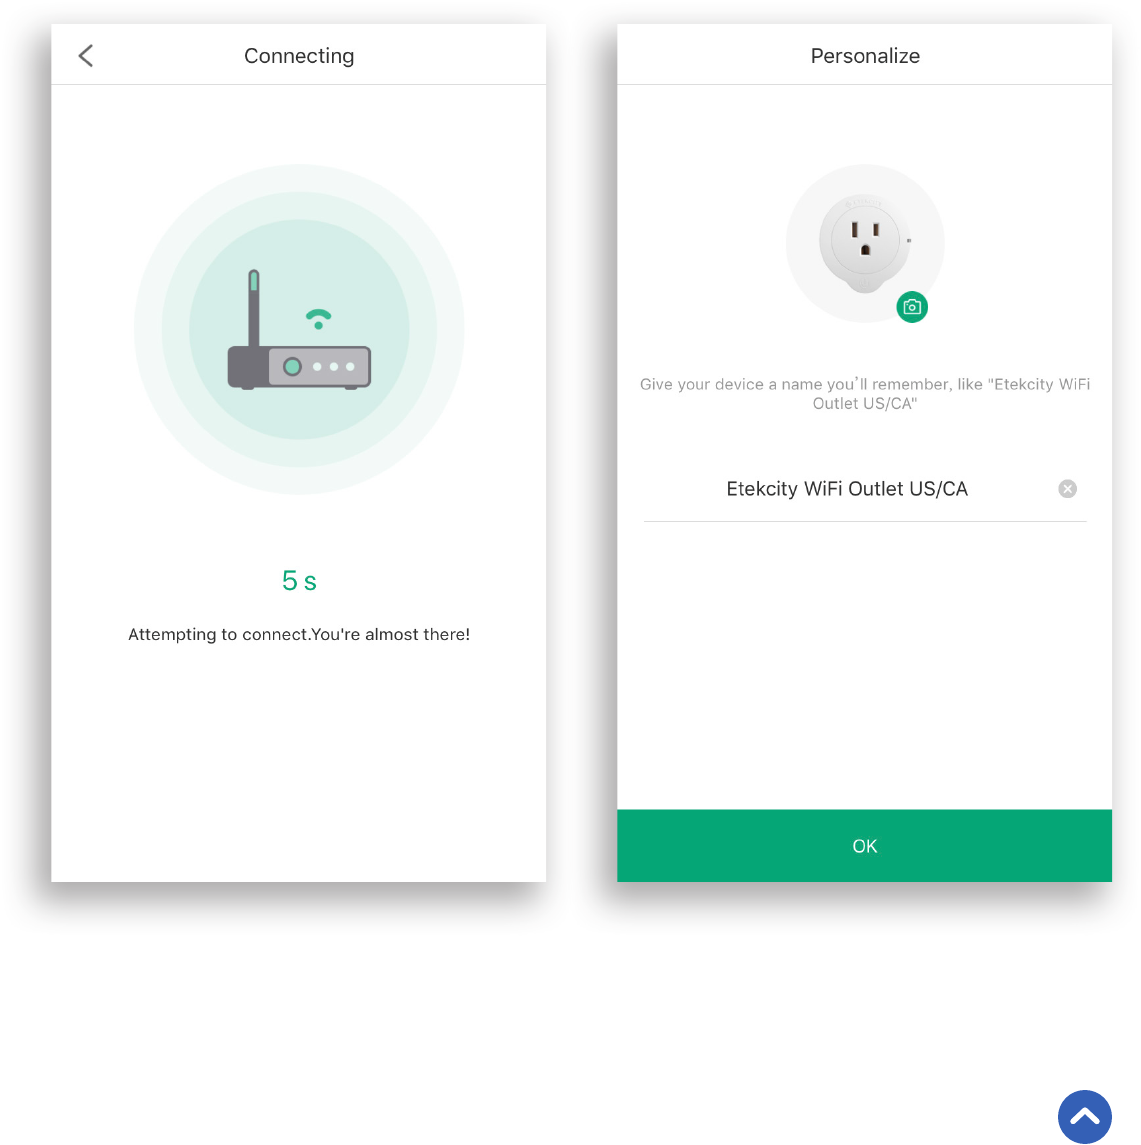
7. The outlet will take a few seconds to connect. If the
Smart Conguration fails, go to APN Mode (page 13).
8. Your setup is complete! Give your outlet a unique
name, or use the default name and tap OK .
Back to Table of Contents
APN Conguration Mode
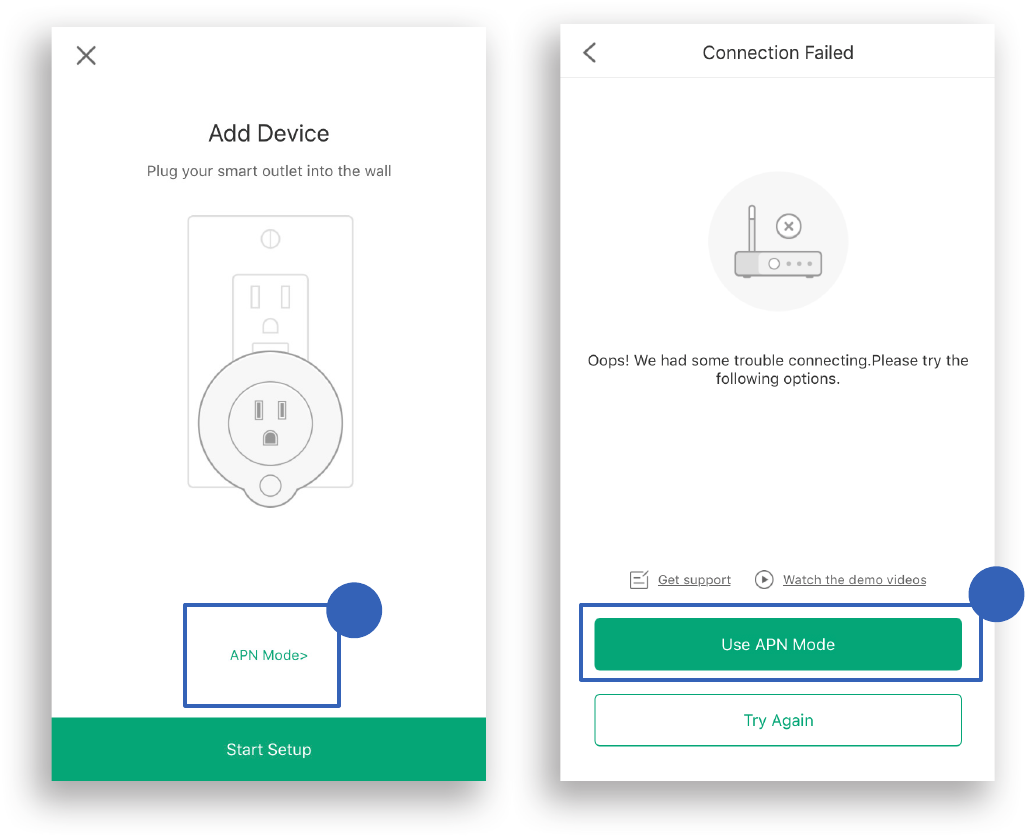
If Smart Conguration Mode fails to connect your smart
switch to your WiFi, you can use APN (Access Point Name)
Mode . You can also choose this mode at the beginning of
setup instead of Smart Conguration Mode .
1. If you’re starting from the initial “ Add Device ”
screen, tap APN Mode . If you’re starting from
the “ Connection Failed ” screen after Smart
Conguration Mode has failed, tap Use APN Mode .
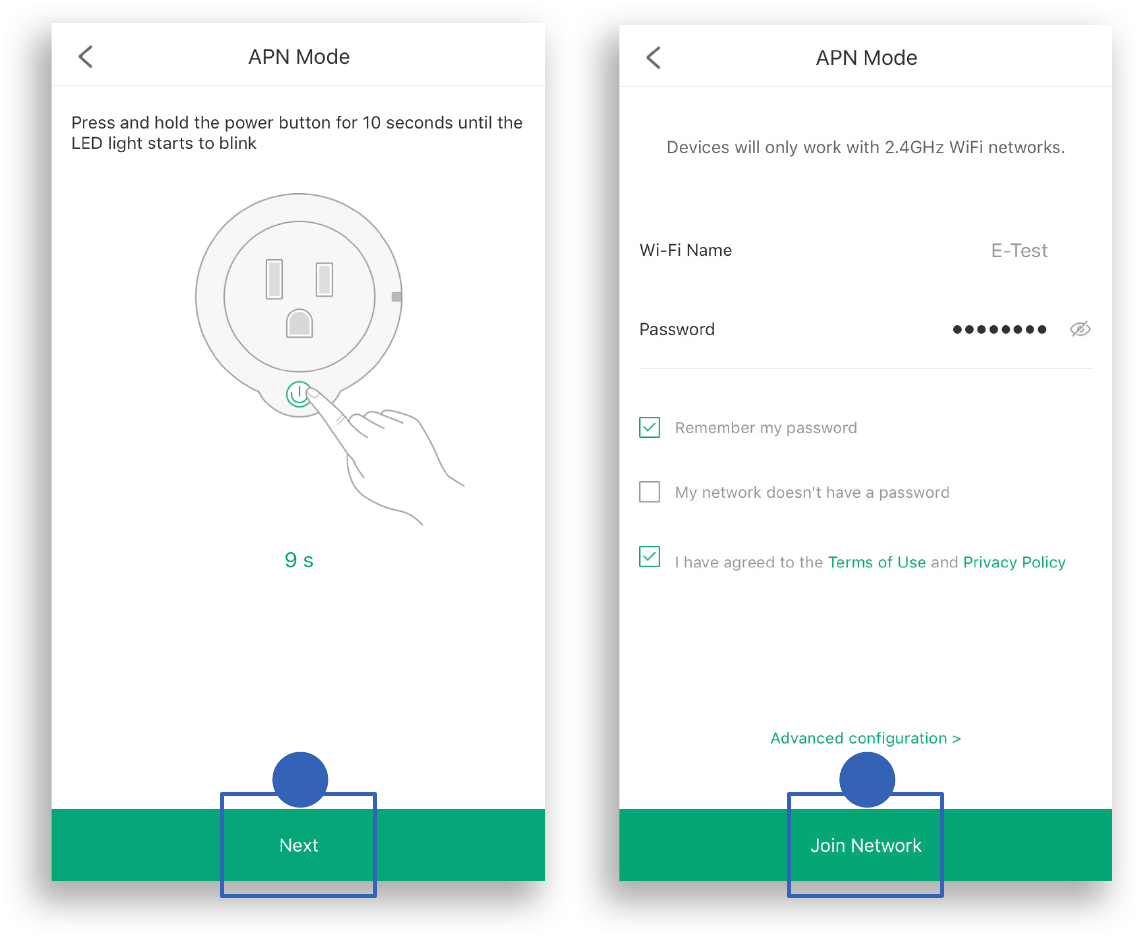
2. Press and hold the power button for 10 seconds until
the LED light slowly blinks blue.
3. Type in the name of your home WiFi network and
password. Then tap Join Network .
Note: The smart outlet c on figur ation r equir es a 2. 4GHz WiFi
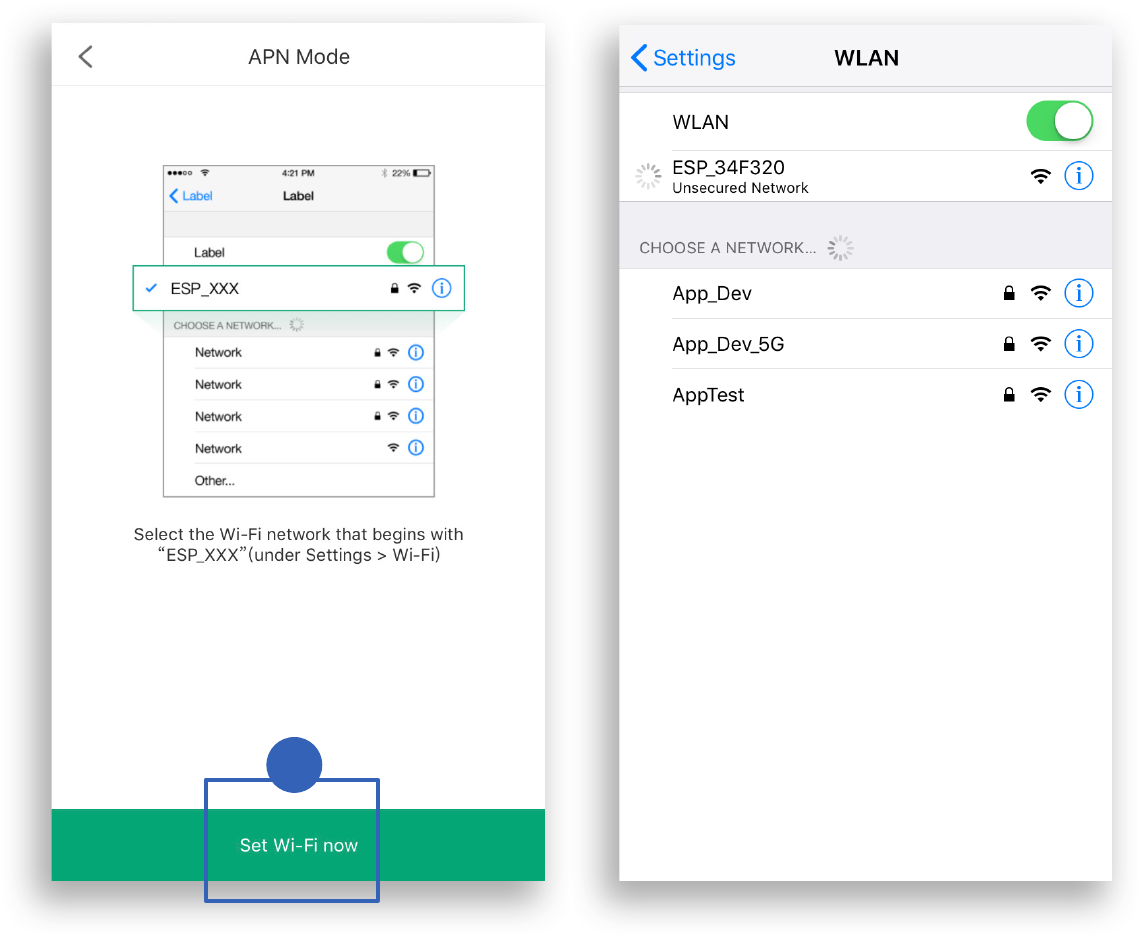
4. Tap Set WiFi Now and select the WiFi network that
reads “ ESP_ ”.
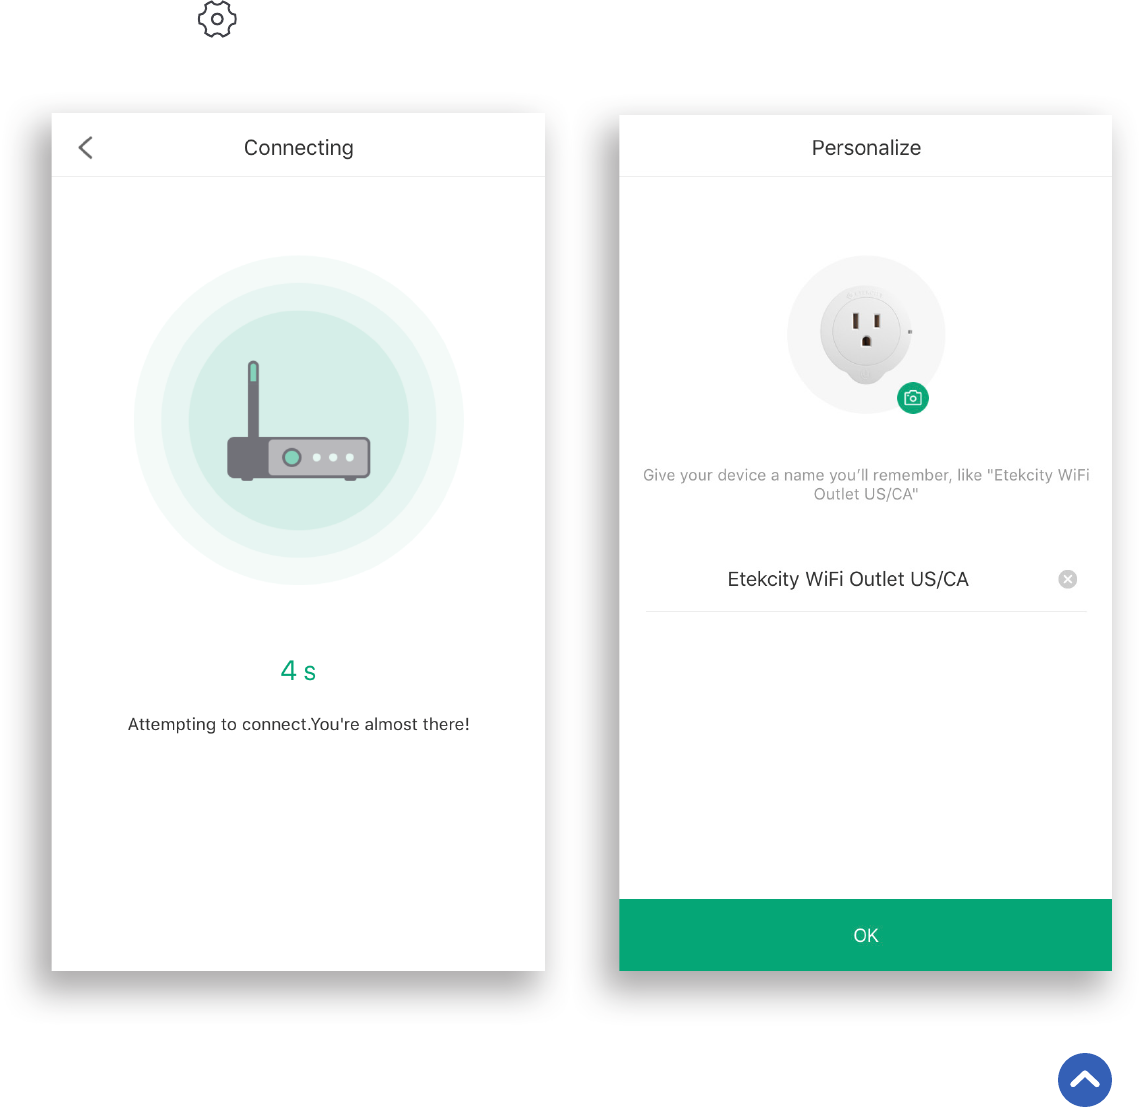
5. The outlet will take a few seconds to connect. To
return to the “ Add Device ” page, tap < .
6. Your setup is complete! Give your outlet a unique
name, or use the default name and tap Ok .
Note: Y ou c an change the de vice name and ic on at any time .
T ap , then tap Device Settings .
Back to Table of Contents
Turning Devices On/Off
On the “ My Home ” page or the smart outlet page, tap
to turn the devices on or off.
Device is Off
Device is On
Note: The outle t will r emain c onnect ed t o the int ernet e ven
when it is turned o f f .
Back to Table of Contents
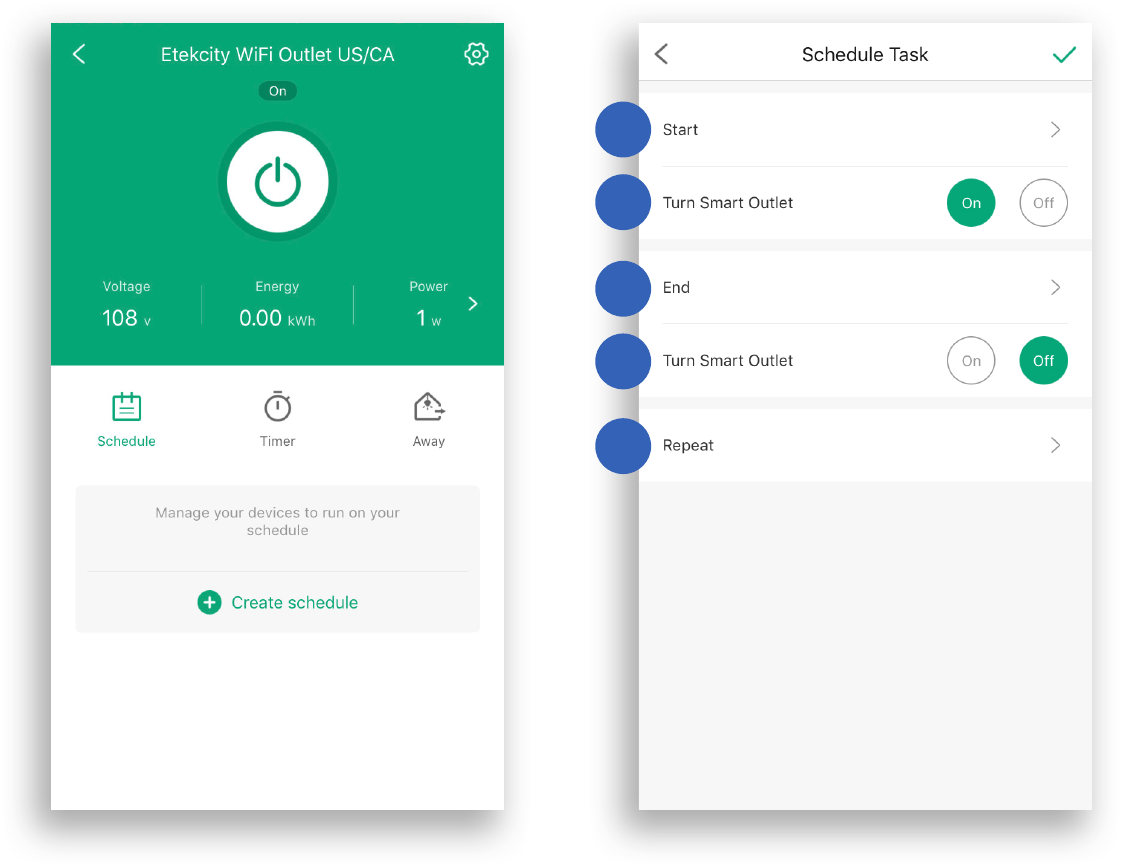
Create Schedule
Go to the smart outlet page.
1. Tap + to create a scheduled time for the smart outlet
to turn on and/or off.
2. Select an option from the “ Schedule Task ” page.
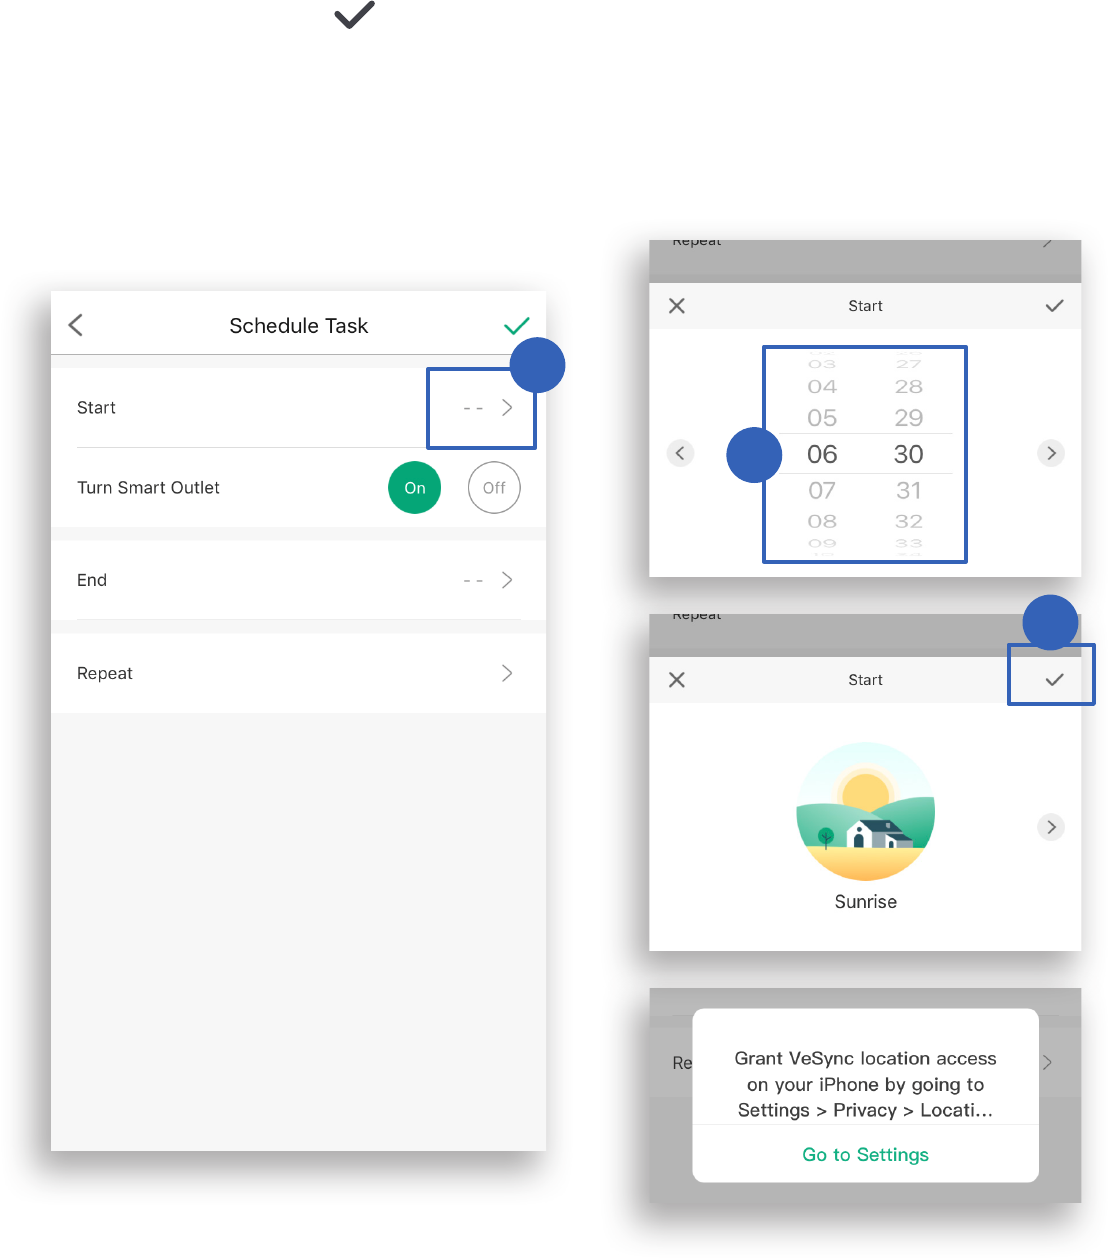
A. To set a start time:
1. Tap > next to Start .
2. Scroll up and down to select time. Alternatively,
tap < for Sunrise and >for Sunset .
3. Tap to conrm.
Note: Y ou must allo w the V eS ync app t o ac ce ss y our location t o
det ermine when S unrise and Suns et ar e for y our ar ea.
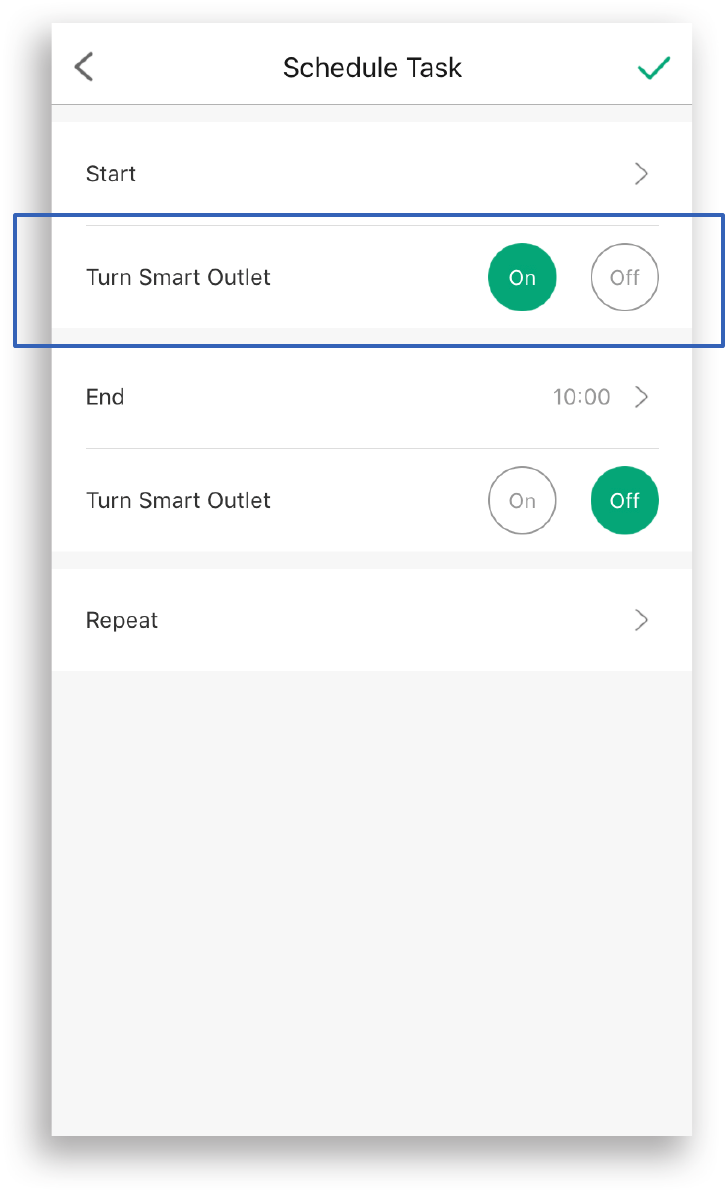
B. Choose On or Off at start time.
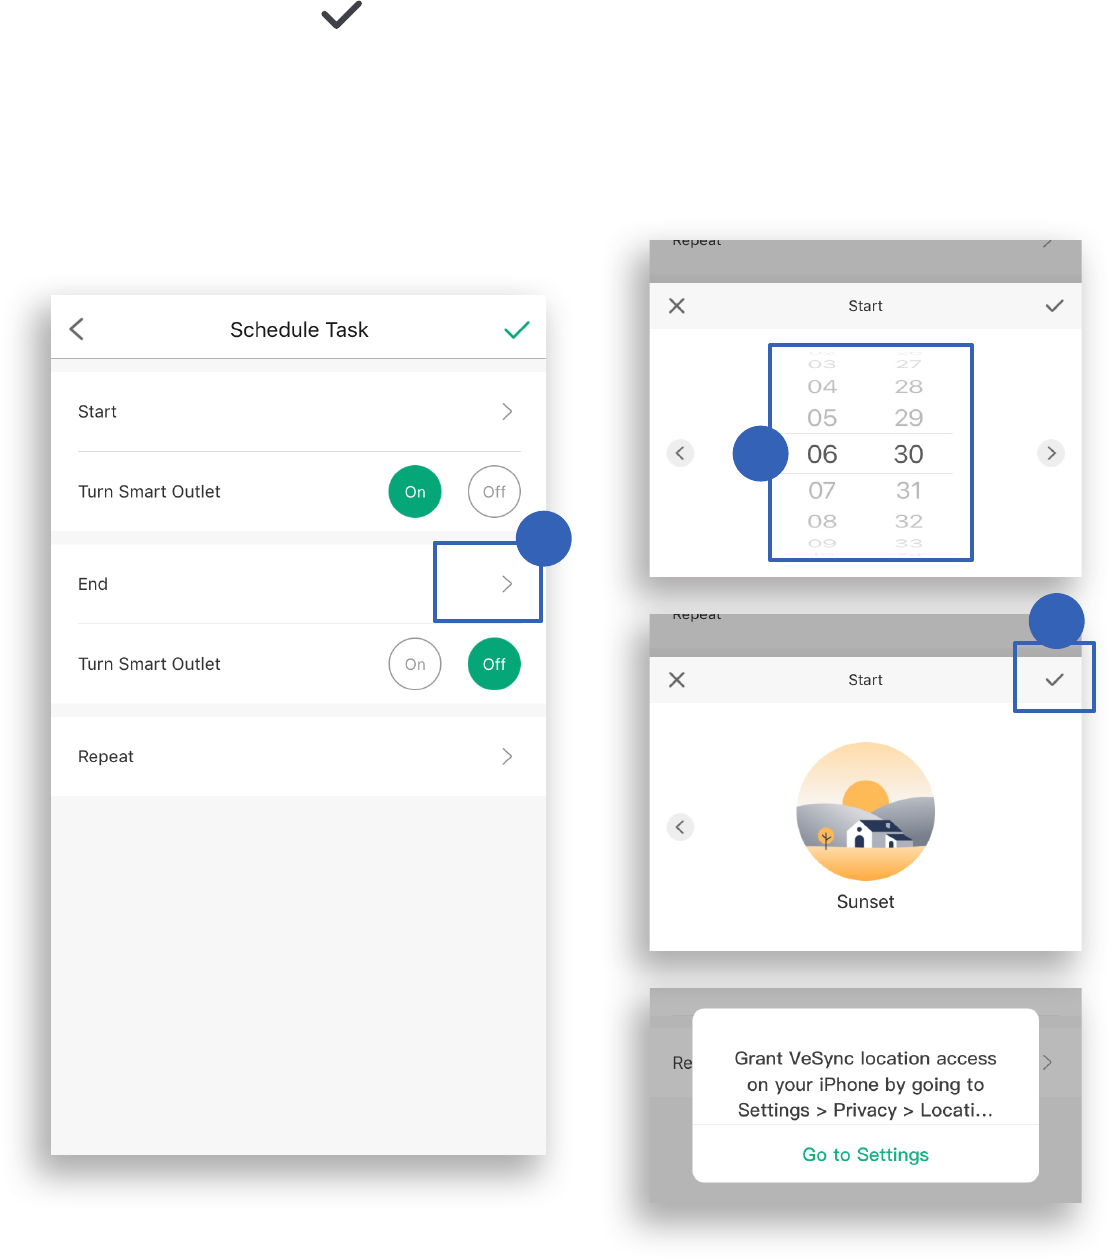
C. To set an end time ( optional ):
1. Tap > next to End .
2. Scroll up and down to select time. Alternatively,
tap < for Sunrise and >for Sunset .
3. Tap to conrm.
Note: Y ou must allo w the V eS ync app t o ac ce ss y our location t o
det ermine when S unrise and Suns et ar e for y our ar ea.
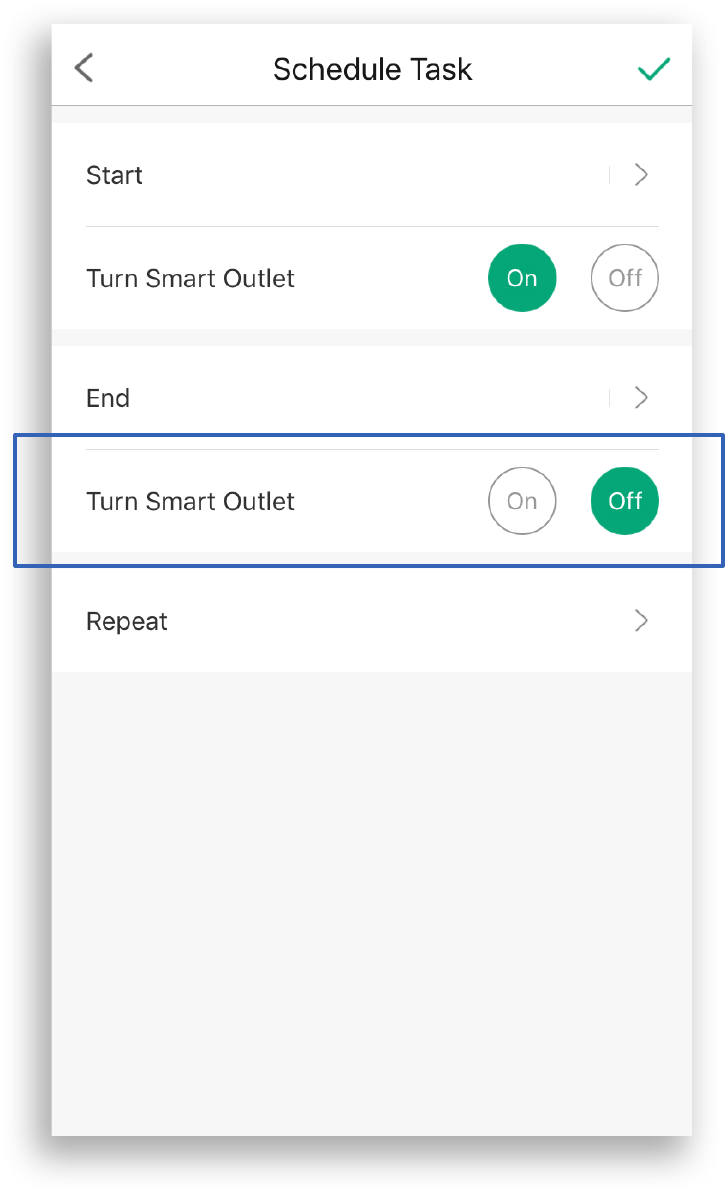
D. Choose On or Off at end time.
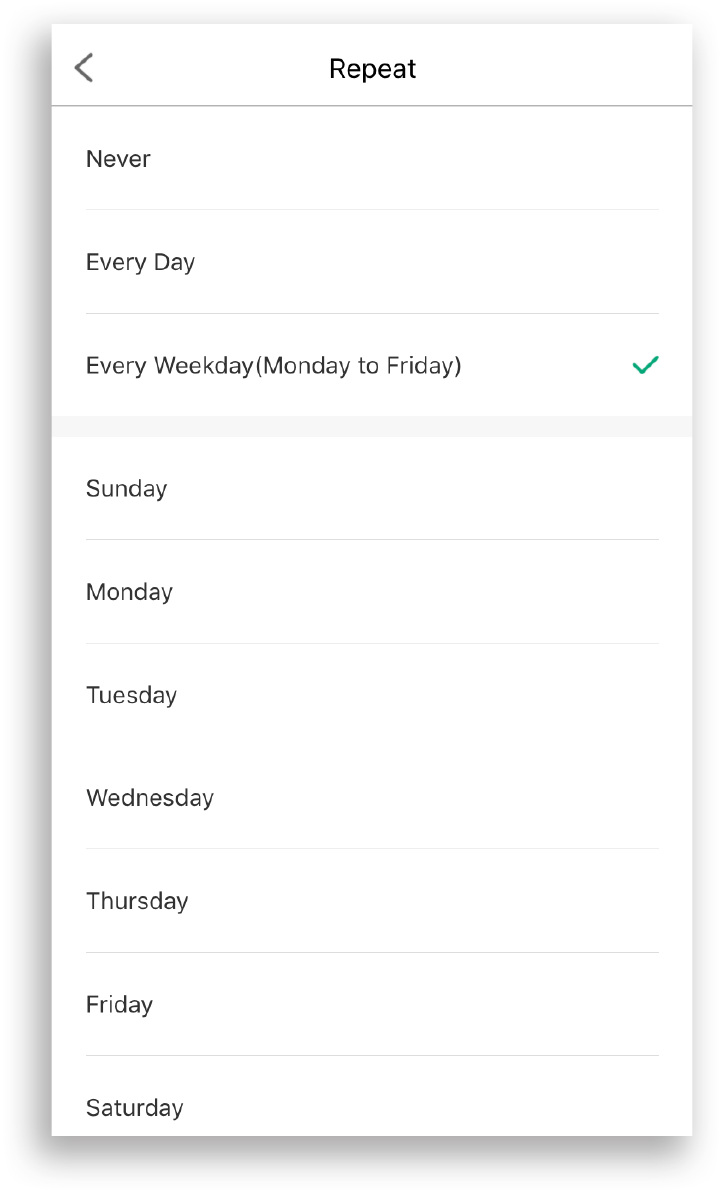
E. Repeat ( Optional ) - Select days you want this task
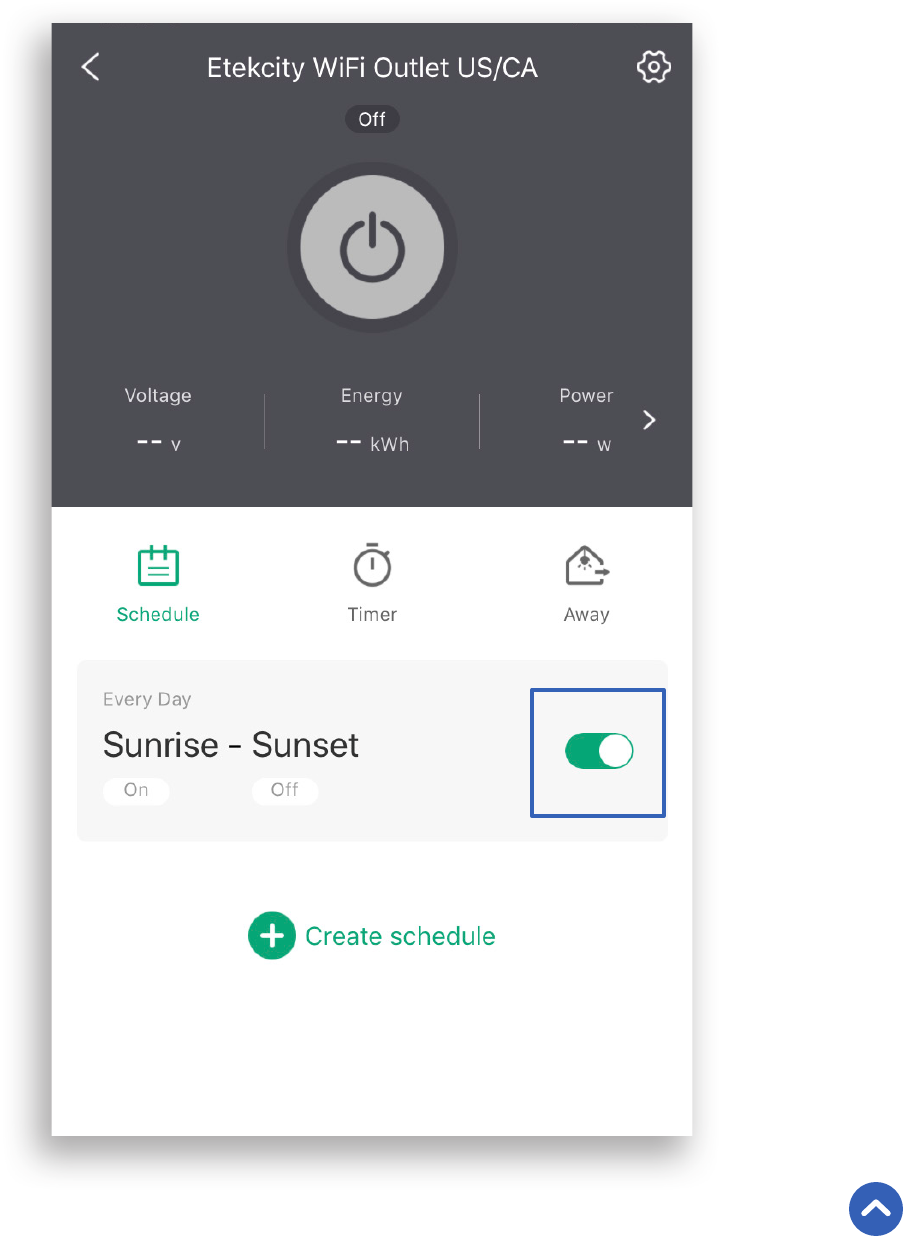
3. Turn the schedule on or off on the smart outlet page
by tapping the toggle next to the scheduled time.
Back to Table of Contents
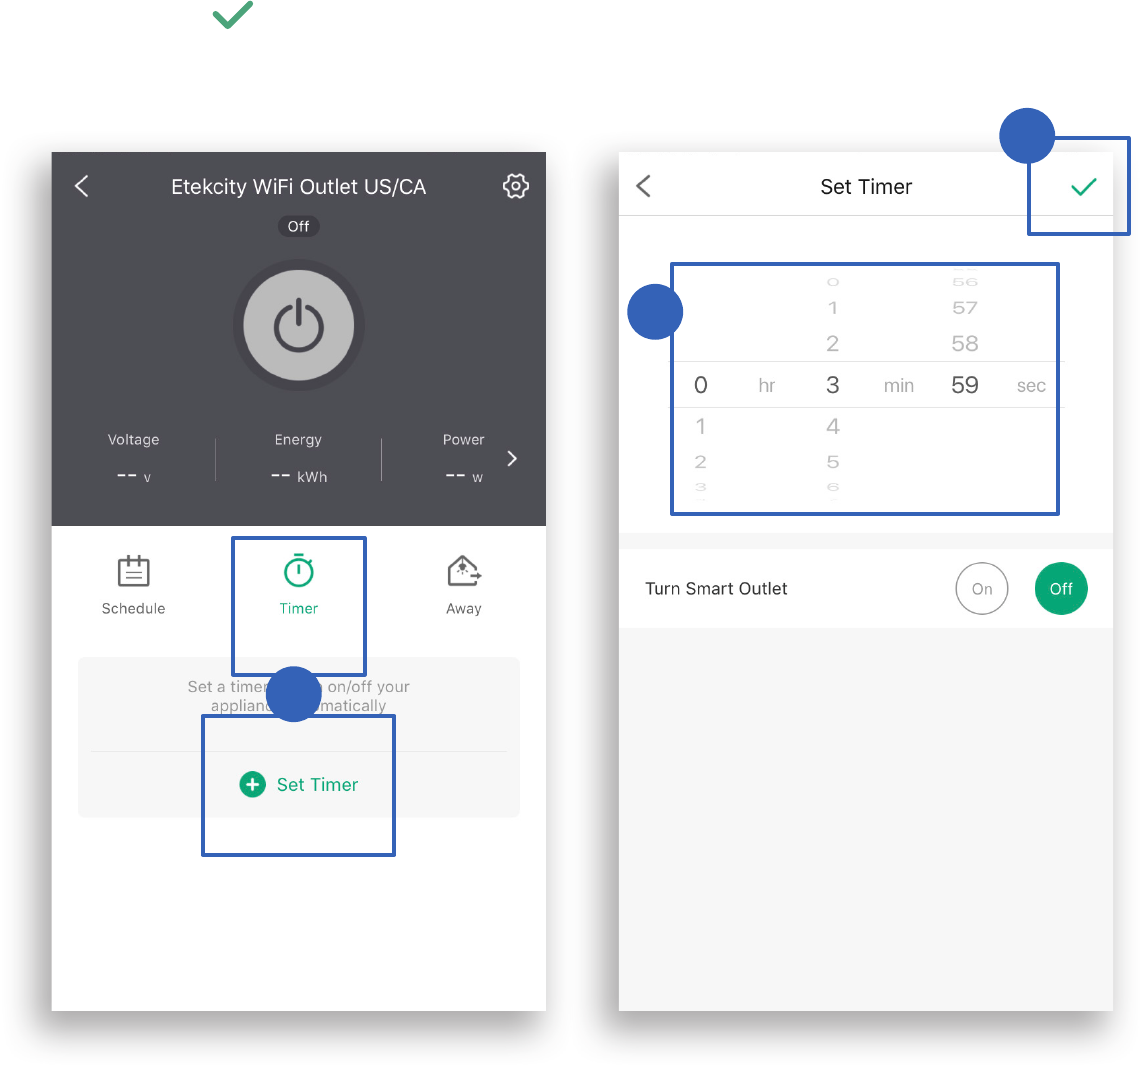
You can create a timer to turn your smart outlet on and off.
1. Tap Timer . Then, Set Timer .
2. Scroll up and down to set time and select On or Off .
3. Tap to conrm and start timer. Timer will start
automatically.
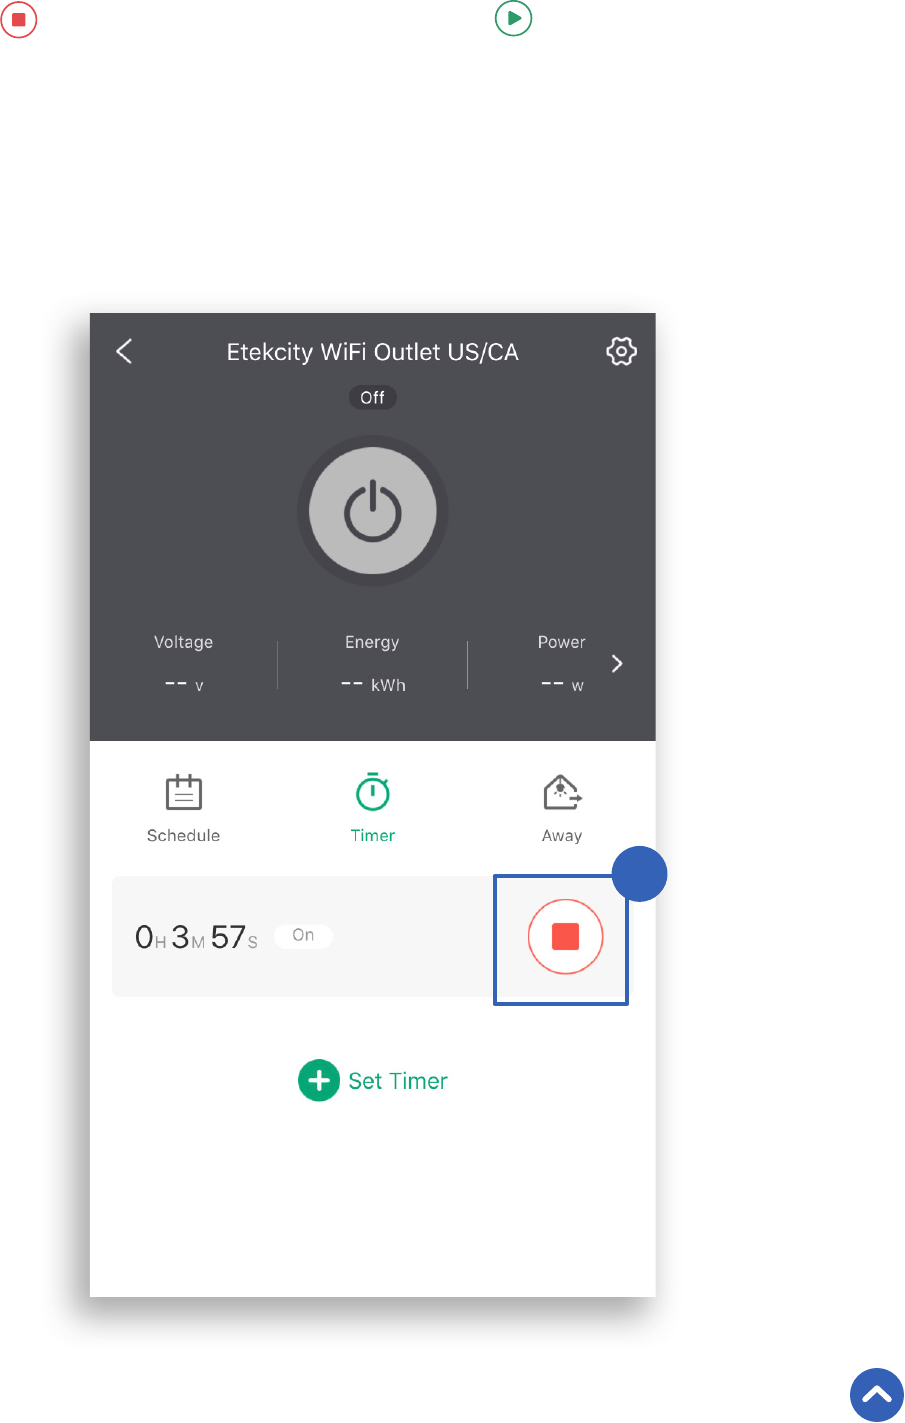
• If y ou s elect ed On, the timer will turn on aft er the timer ends.
• T o r emo v e the timer entry , tap on the timer entry , then t ap Delet e .
4. Tap to cancel the timer. Tap to restart the timer.
Back to Table of Contents
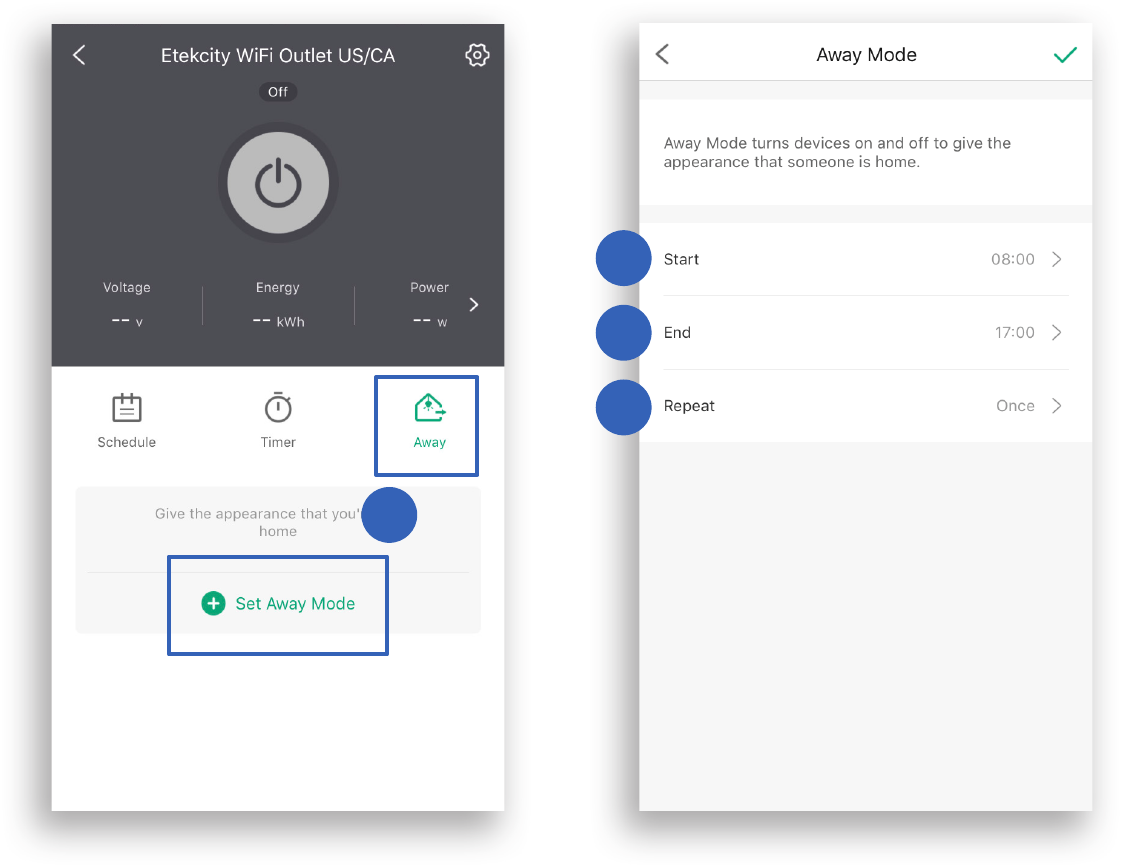
When you have a light plugged into your smart outlet, you
can use the Away Mode timer to turn your light on and off
to give the appearance that someone is home.
1. Tap Away , then Set Away Mode .
2. Select an option from the “ Away Mode ” page.
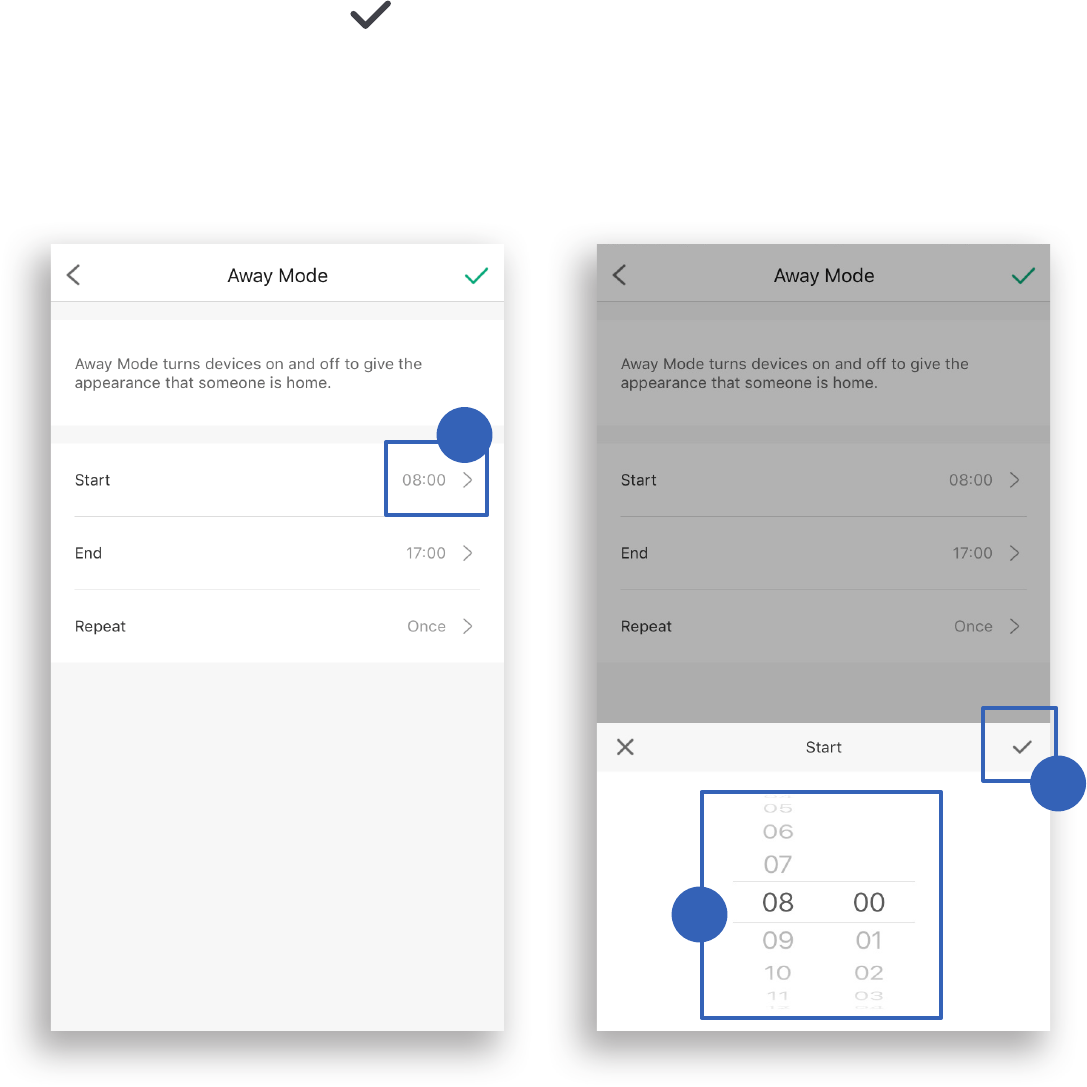
Sets time to start Away Mode
1. Tap > next to “ Start ”.
2. Scroll up and down to select time.
3. Tap to conrm.
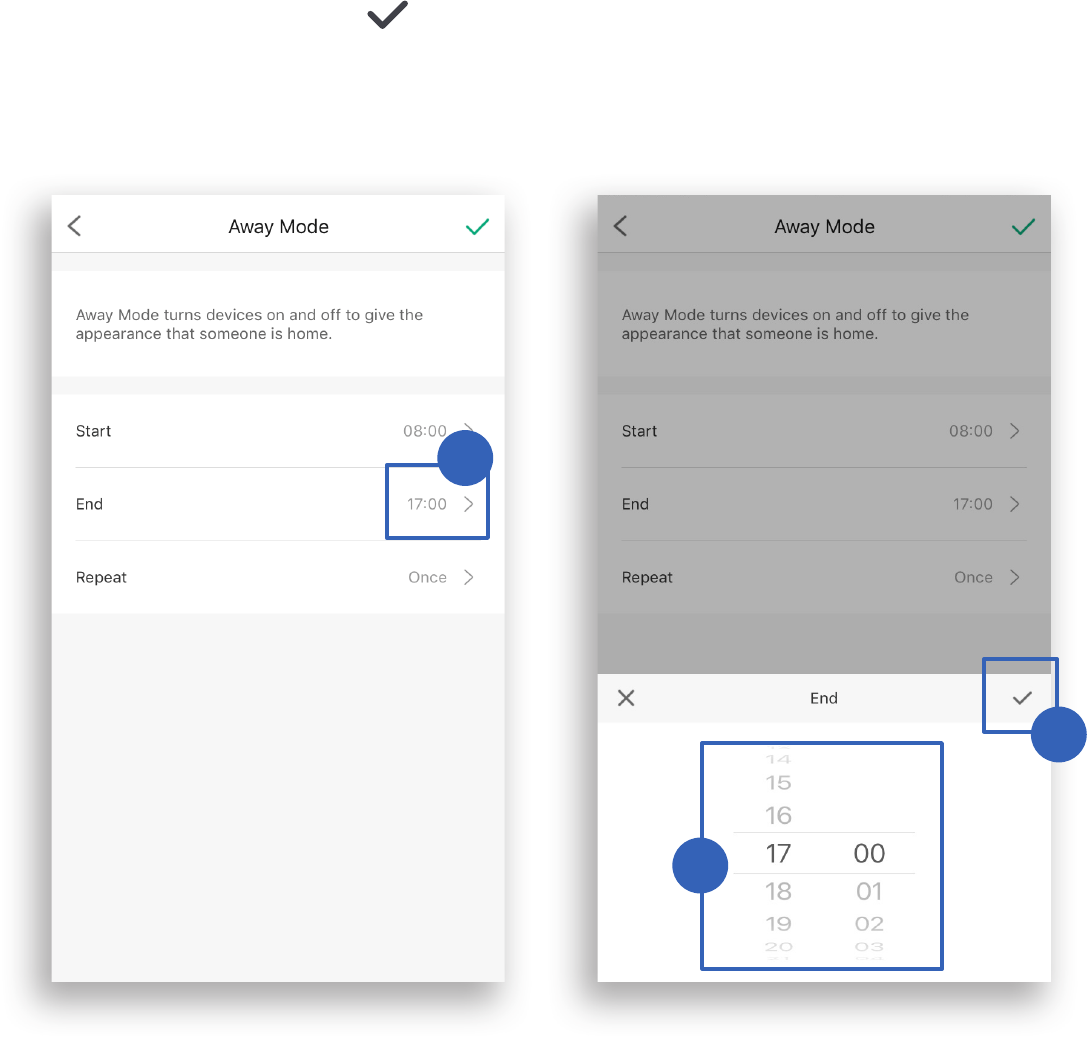
Sets time to end Away Mode
1. Tap > next to “ End ”.
2. Scroll up and down to select time.
3. Tap to conrm.
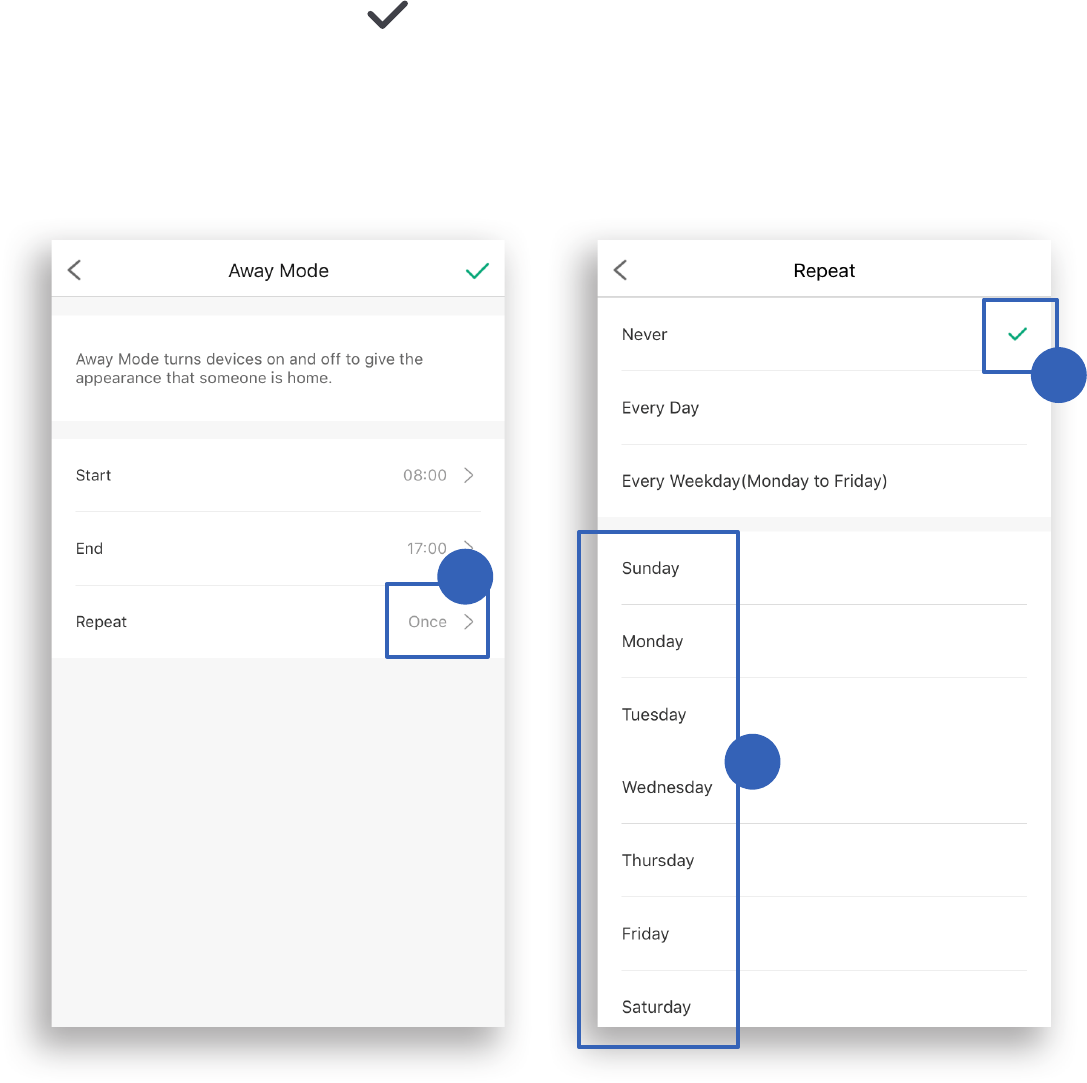
Select days you want to repeat Away Mode
1. Tap > next to “ Repeat ”.
2. Select days you want this task to repeat.
3. Tap to conrm.
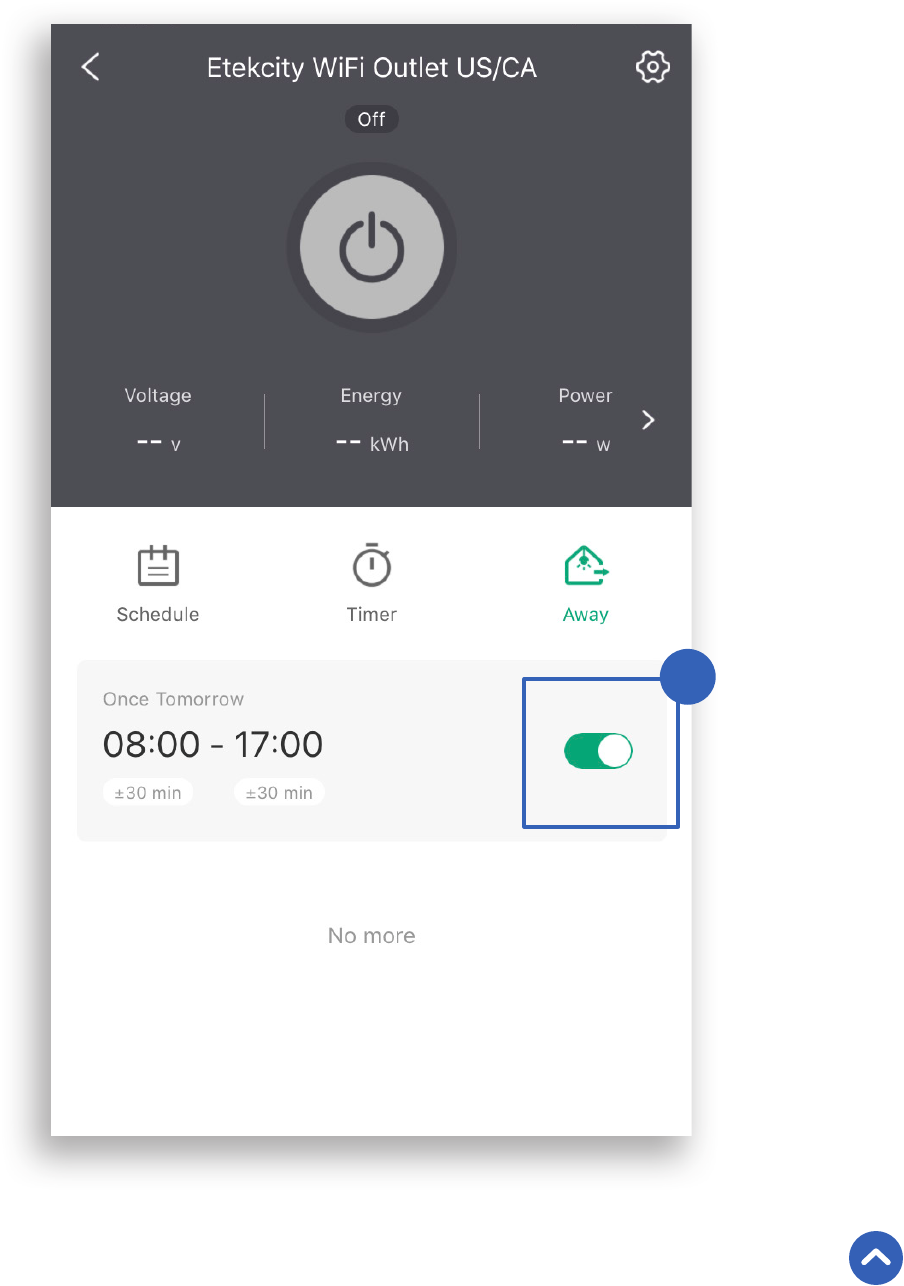
3. You can turn the Away Mode timer on/off at any time
by tapping the toggle button to the right of the timer.
Back to Table of Contents
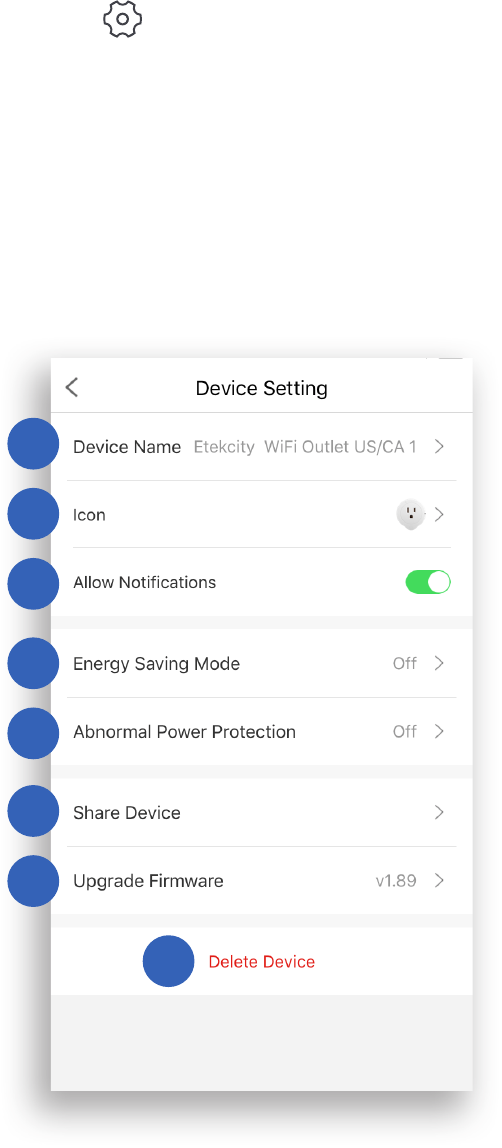
Smart Outlet Settings
Tap to see Device Settings. The Device Settings menu
allows you to:
A. Edit your smart outlet
B. Edit your smart outlet
C. Turn smart outlet
notications on/off.
D. Turn on/off Energy Saving
Mode (see page 33).
E. Turn on/off Abnormal
Power Protection (see
F. Share your smart outlet
(see page 35).
G. Upgrade Firmware.
• Tap to update rmware.
H. Delete your smart outlet
(see page 36).
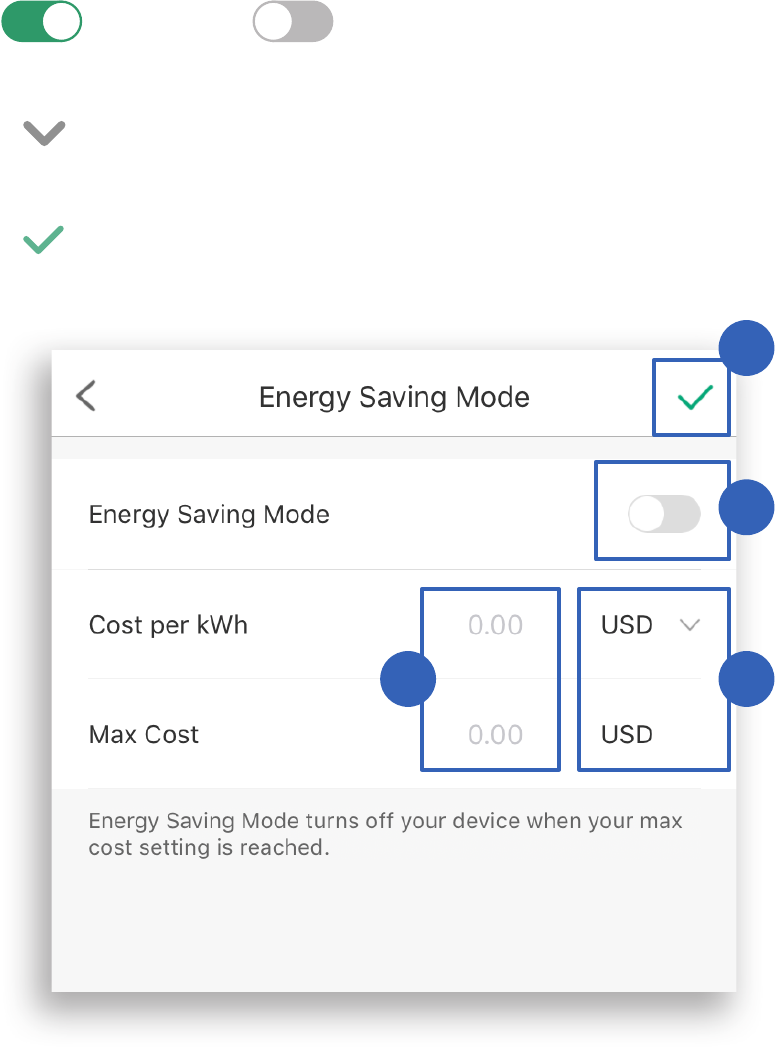
Energy Saving Mode
The VeSync App allows you to program your smart outlet
to save on energy costs by turning off your appliance when
the maximum cost setting is reached.
1. Tap the toggle switch to turn Energy Saving Mode
on and off .
2. Enter the Cost per KWh and Max Cost.
3. Tap to switch between the monetary units, EUR or
4. Tap to conrm.
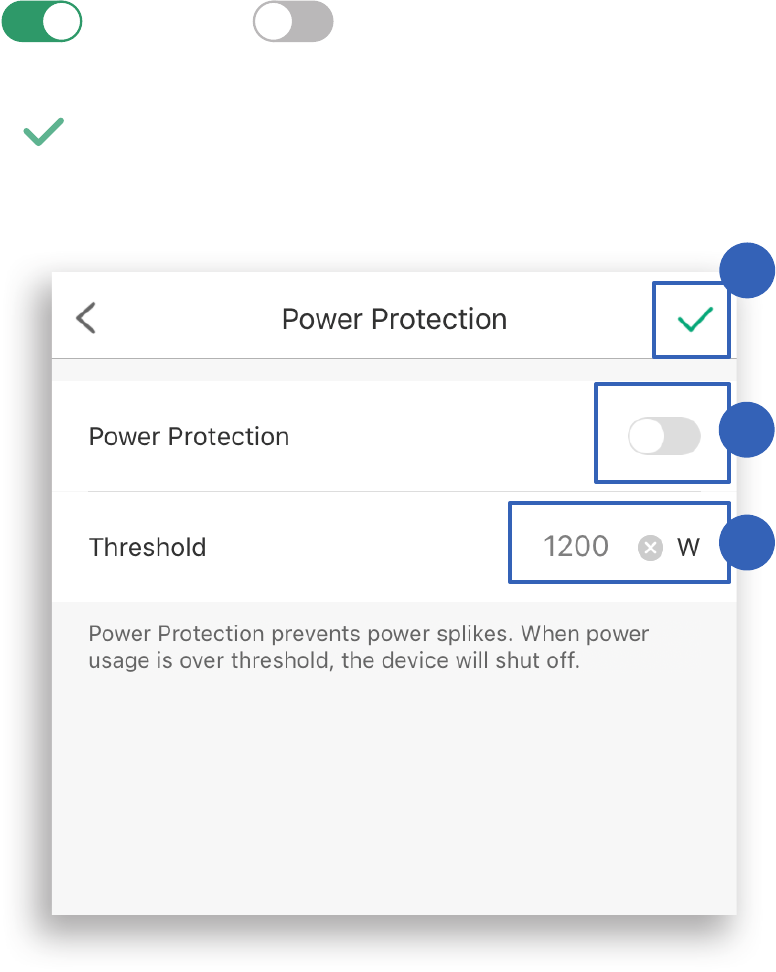
Abnormal Power Protection
Turn on the Power Protection to protect your connected
appliances from power spike damage.
1. Tap the toggle switch to turn Power Protection
on and off .
2. Enter Threshold.
3. Tap to conrm.
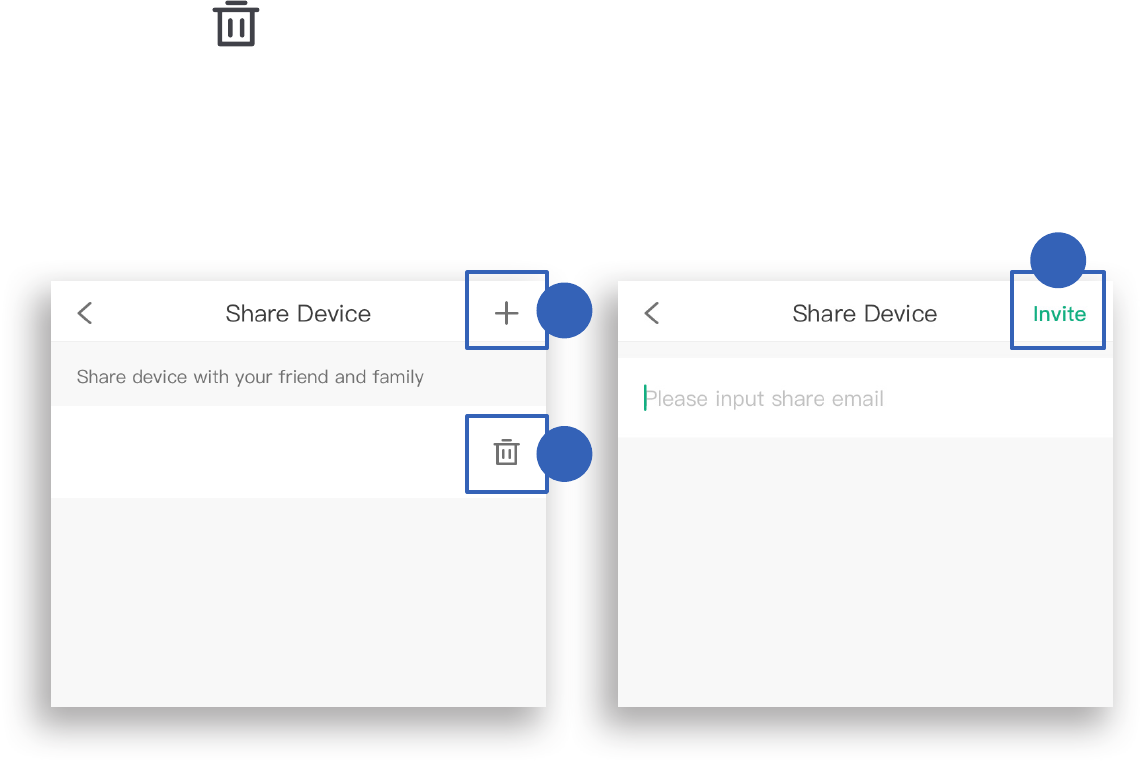
Share Your Smart Outlet
Use Share Device to allow someone else to control your
smart outlet (such as family, friends, roommates, or anyone
you choose).
2. Type in the email of the person you want to share your
device with. Tap Invite .
3. Tap to remove people you have shared your
device with. They will no longer be able to control your
smart outlet.
Note: P eople who y ou shar e y our smar t outlet with c annot edit or
delet e an y of y our devic e s et tings.
example@email.com
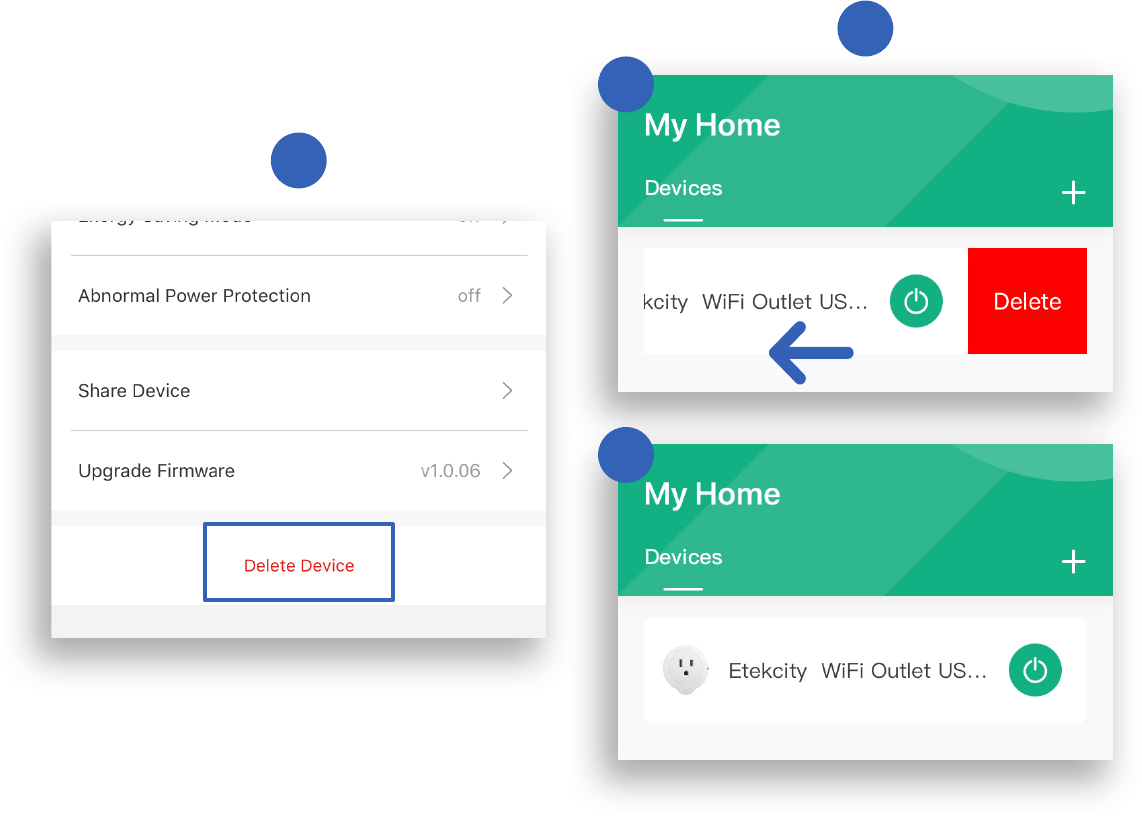
Delete a Smart Outlet
A. You can delete your smart outlet from the VeSync app from
the “ Device Settings ” screen. To delete your device, tap
Delete Device .
B. You can also delete your smart outlet from the “ My Home ”
screen in the VeSync app.
a. iOS™: Swipe left on the smart outlet’s name to
b. Android™: Press and hold for 2 seconds on the
smart outlet’s name to delete.
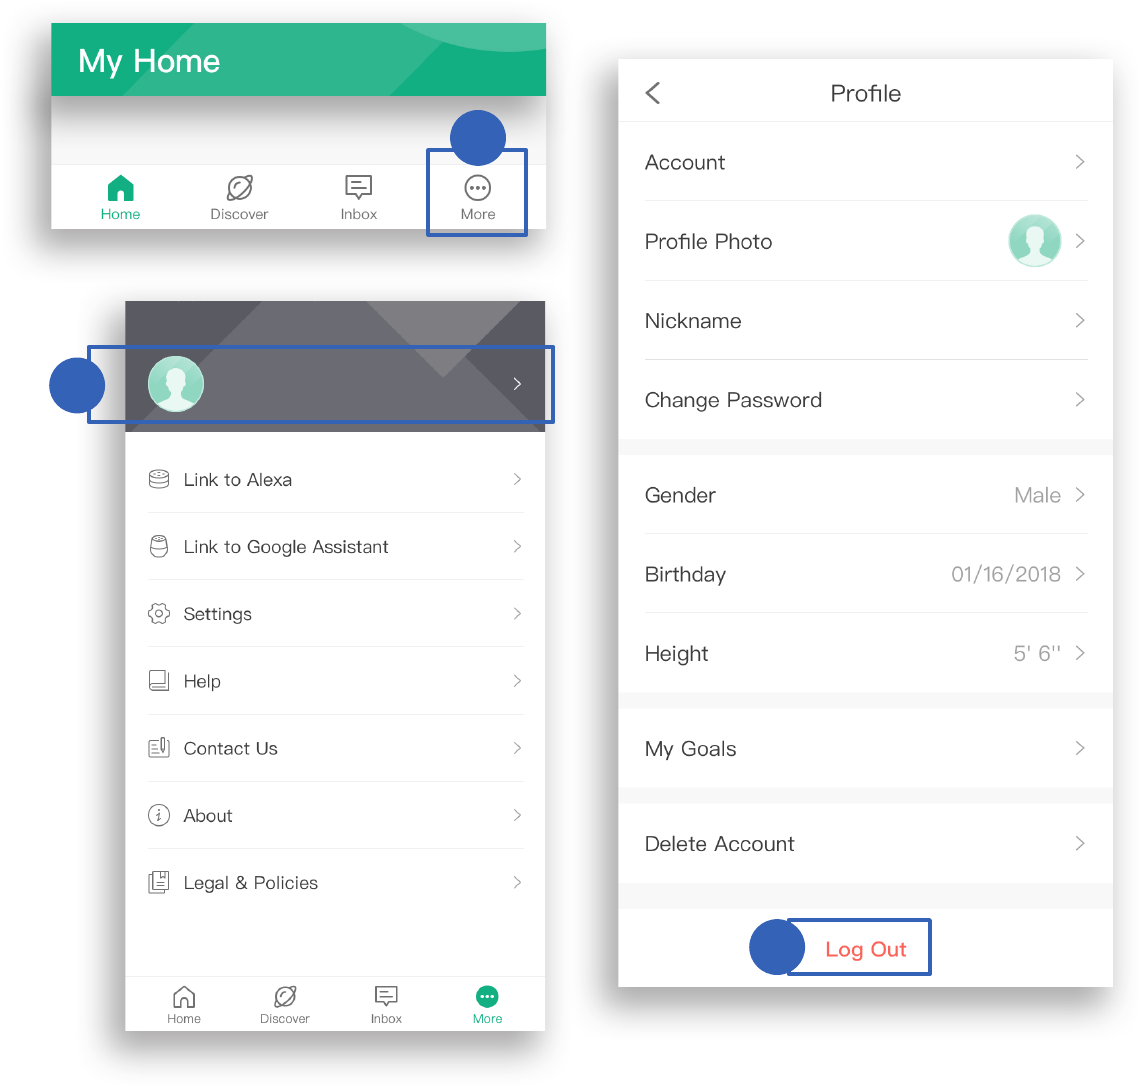
On the “ My Home ” page, tap More , for more features.
To view instructions on the VeSync app, tap More , then tap
To view instructions on the VeSync app, tap More , then tap
Link to Google Assistant .
More Features
Connecting with Amazon® Alexa™
Connecting with Google Home™
Note: Y ou must cr eat e y our o wn V eS ync acc ount t o c onnect
with Ale x a.
Note: Y ou must cr eat e y our o wn V eS ync acc ount t o c onnect
with Google Home .
Note: Y ou do not need t o log out if y ou are no t using a
V eS ync acc ount .
1. On the “ My Home ” screen, tap More .
2. Tap your prole, then tap Log Out .
example@email.com
example@email.com
Pairing Your Smart Outlet with IFTTT
1. Download the IFTTT app from the App Store or Google
Play store.
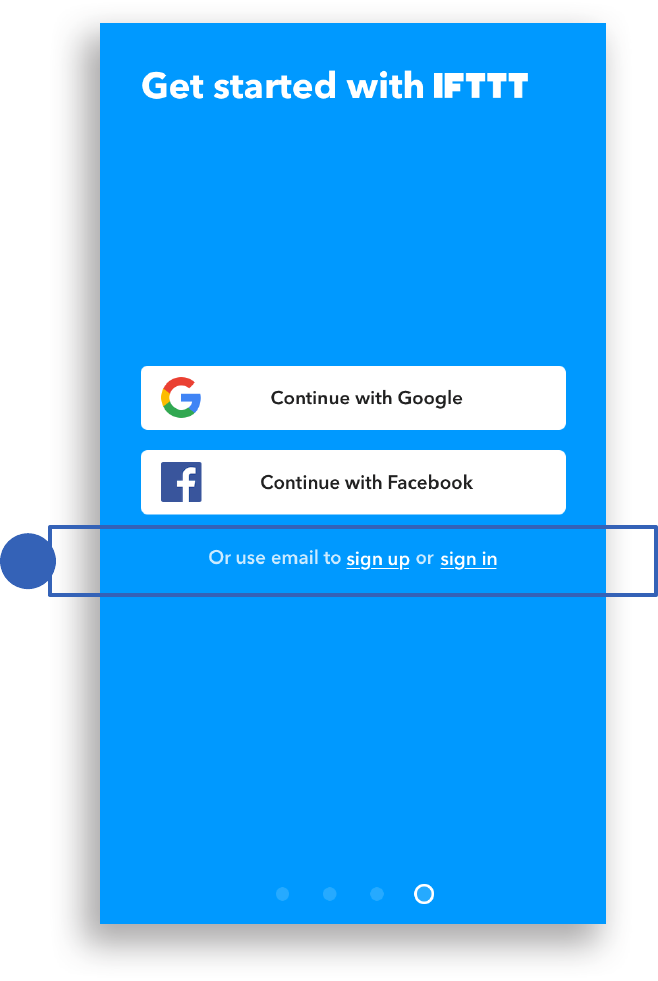
2. Open the app and tap sign up or sign in .
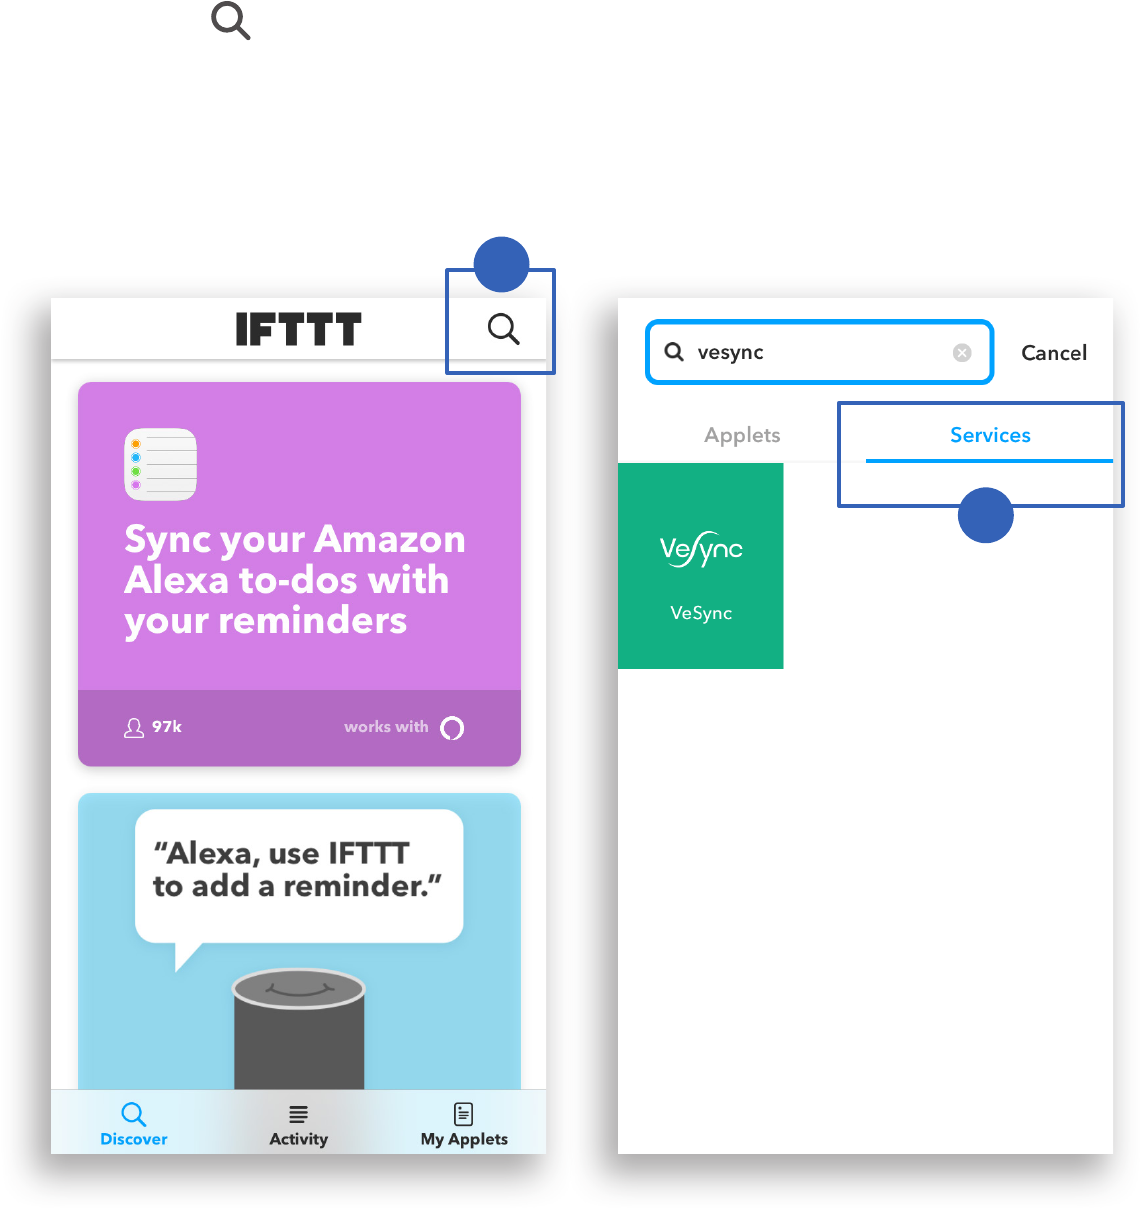
4. Enter “ VeSync ” and tap Services .
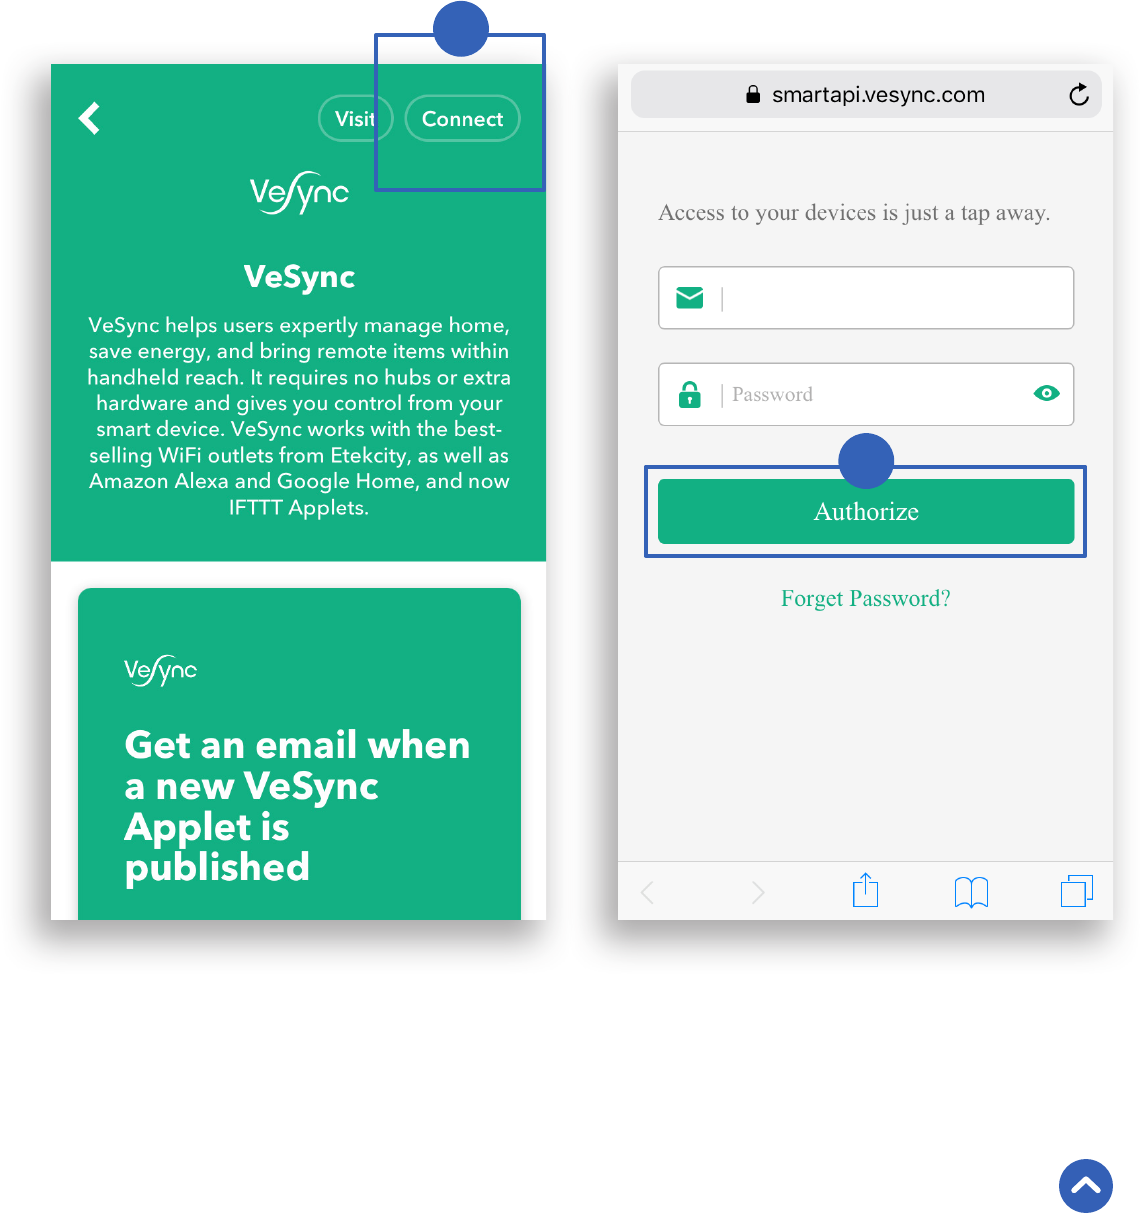
5. Tap Connect .
6. Enter your VeSync account details and tap Authorize .
example@email.com
Back to Table of Contents
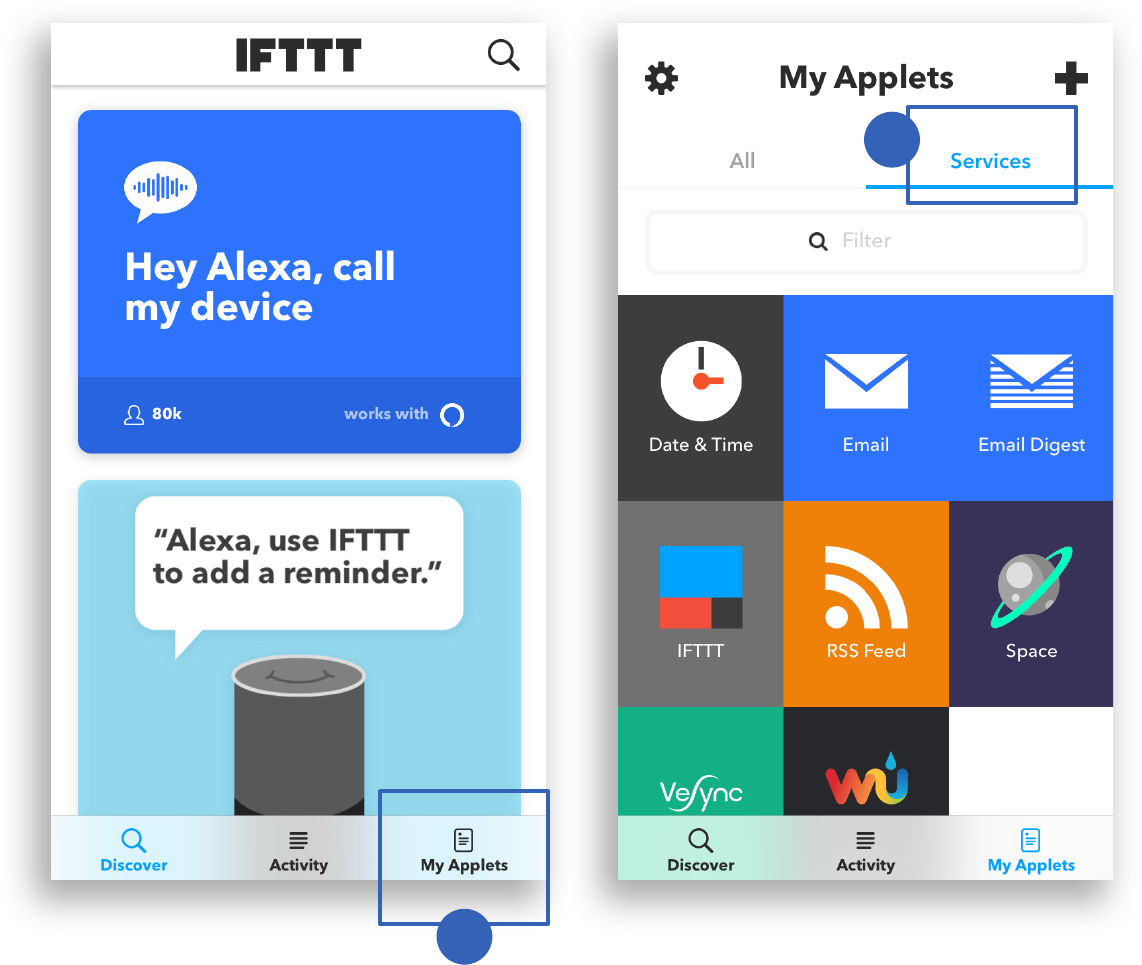
Create an Applet Using Existing VeSync Templates
1. Open the IFTTT app and tap My Applets .
2. Tap Services and tap VeSync .

3. Scroll to search for an applet you want to use, such
as “ Turn on a VeSync smart device at sunrise “ or
“ Activate a device every day at a specic time “.
4. Slide the toggle switch to turn on the applet.
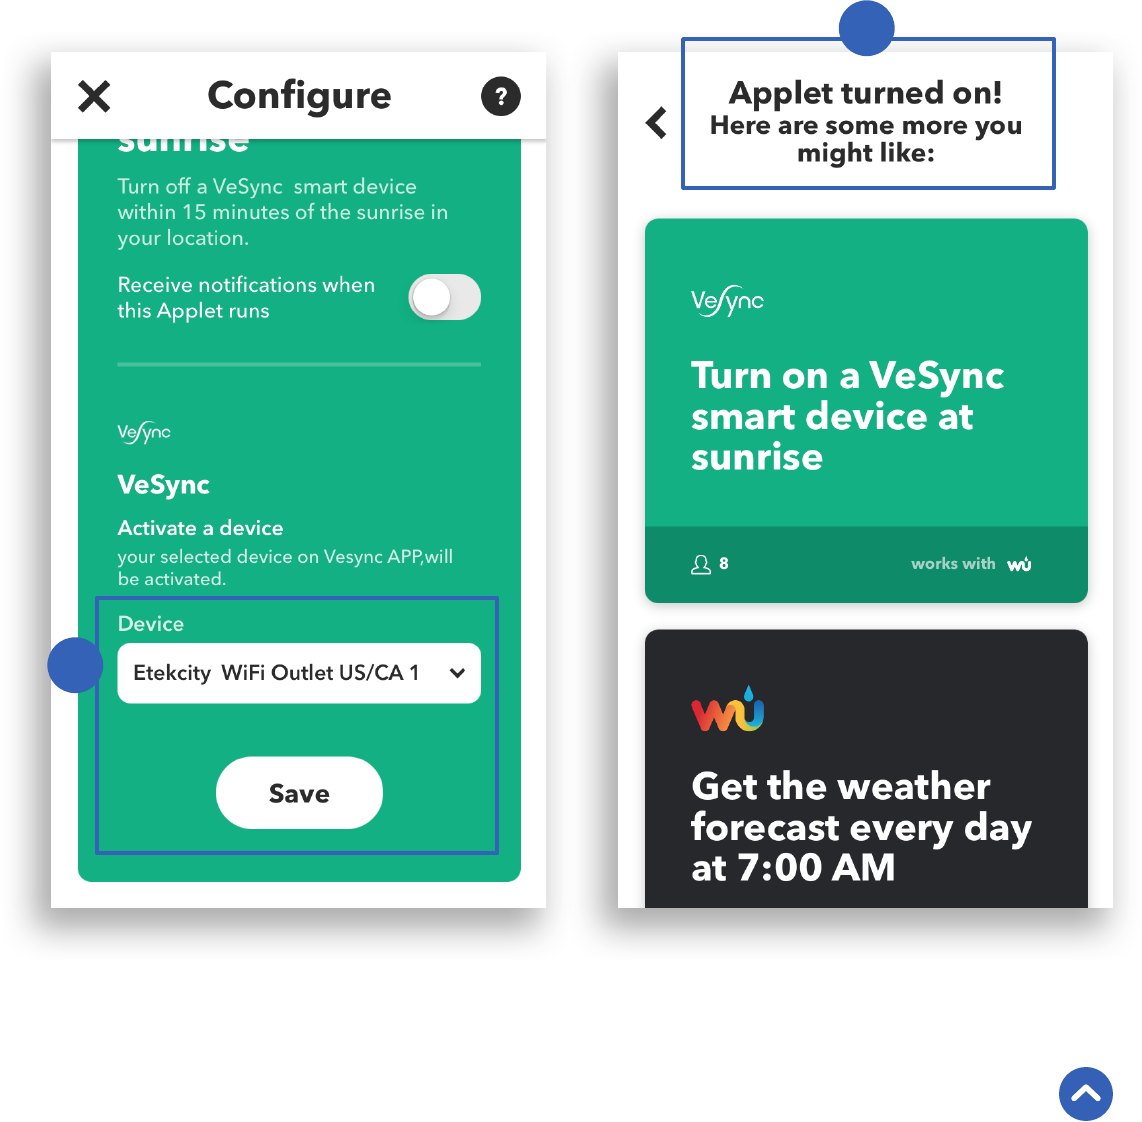
5. Under Device , select the smart outlet that you want
the applet to apply to and tap Save .
6. The applet has been created successfully!
Back to Table of Contents
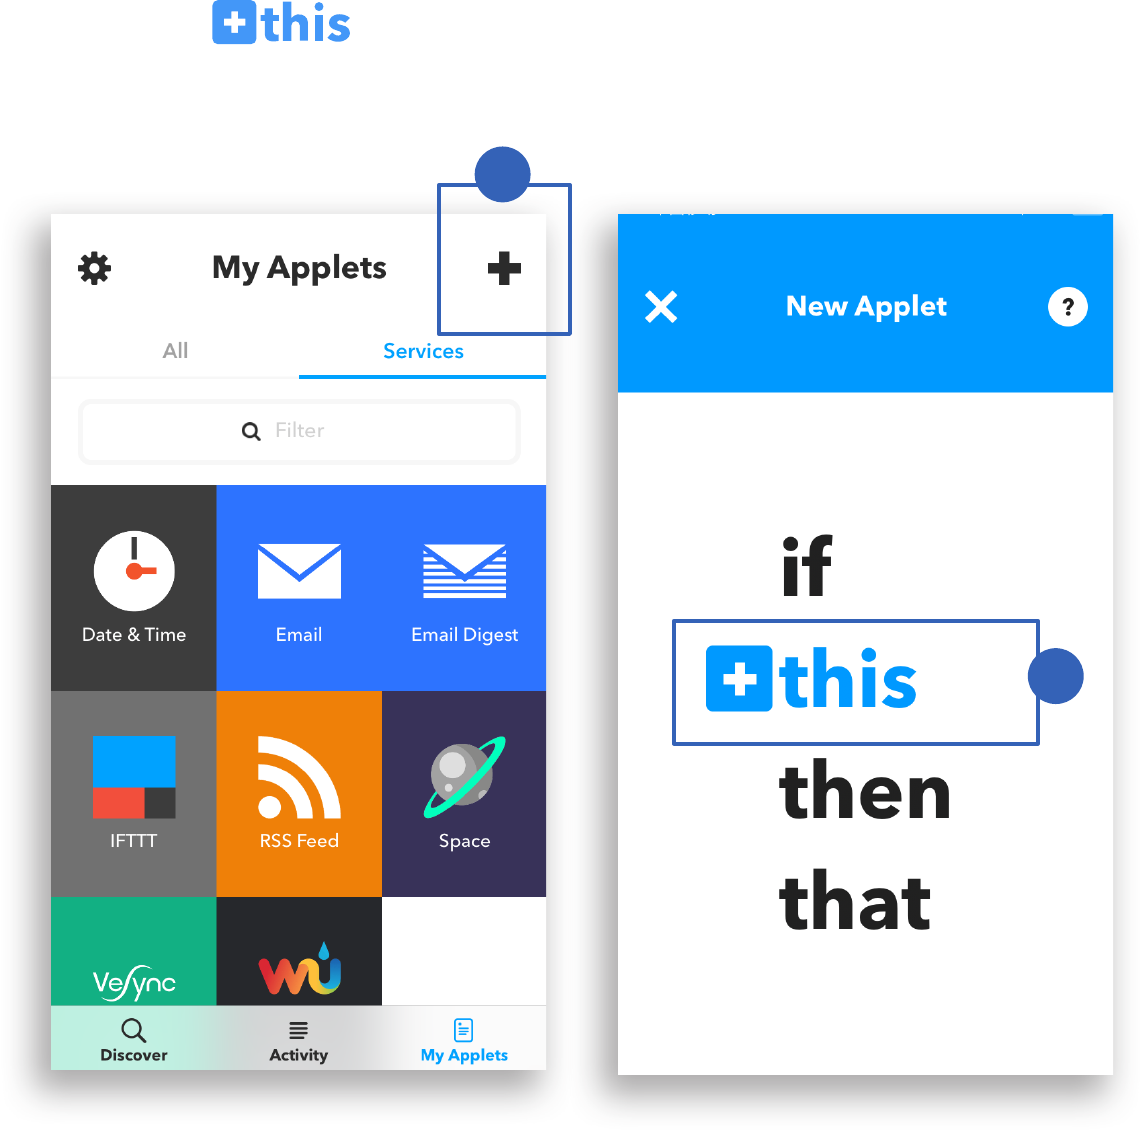
Create a Custom Applet
1. On the My Applets screen, tap + .
2. Tap to add a Trigger Service.

To trigger a service everyday at 11:45 PM:
a. Tap the Date & Time icon.
b. Tap Every day at .
c. Under “ Time ”, select 11:45 PM.
Note: P opular T rigger Servic es include Dat e & Time , L ocation, and
an Ale x a or Google Home C ommand. Diff eren t T rigger Service s
ha v e diff er ent user int erf ace s.
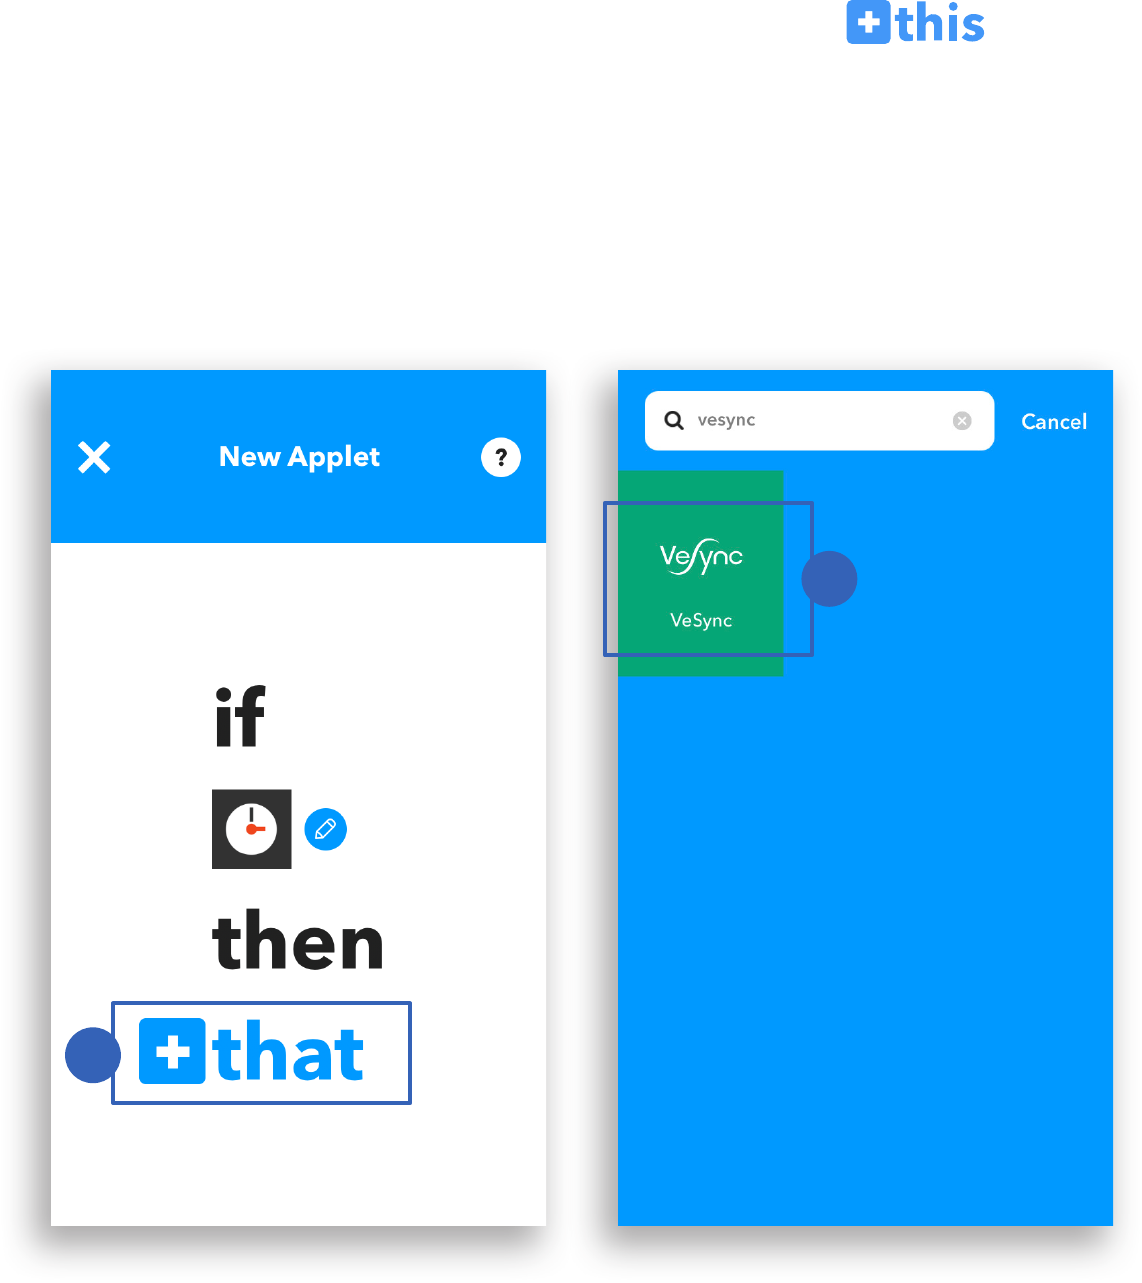
3. After selecting the Trigger Service, tap to
enter an Action Service.
4. Tap the VeSync icon.
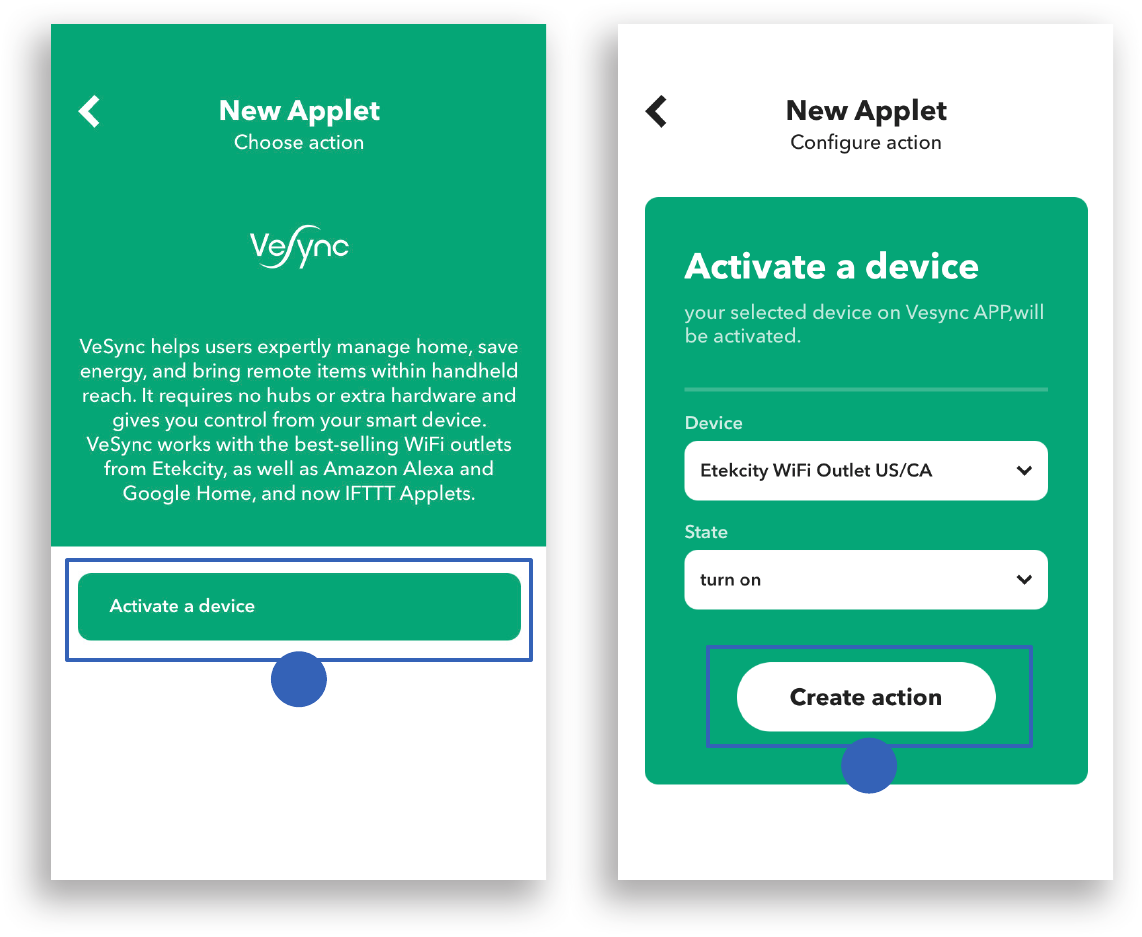
5. Tap Activate a Device .
6. Select the smart outlet and status you would like to
activate (turn on or turn off). Tap Create Action .
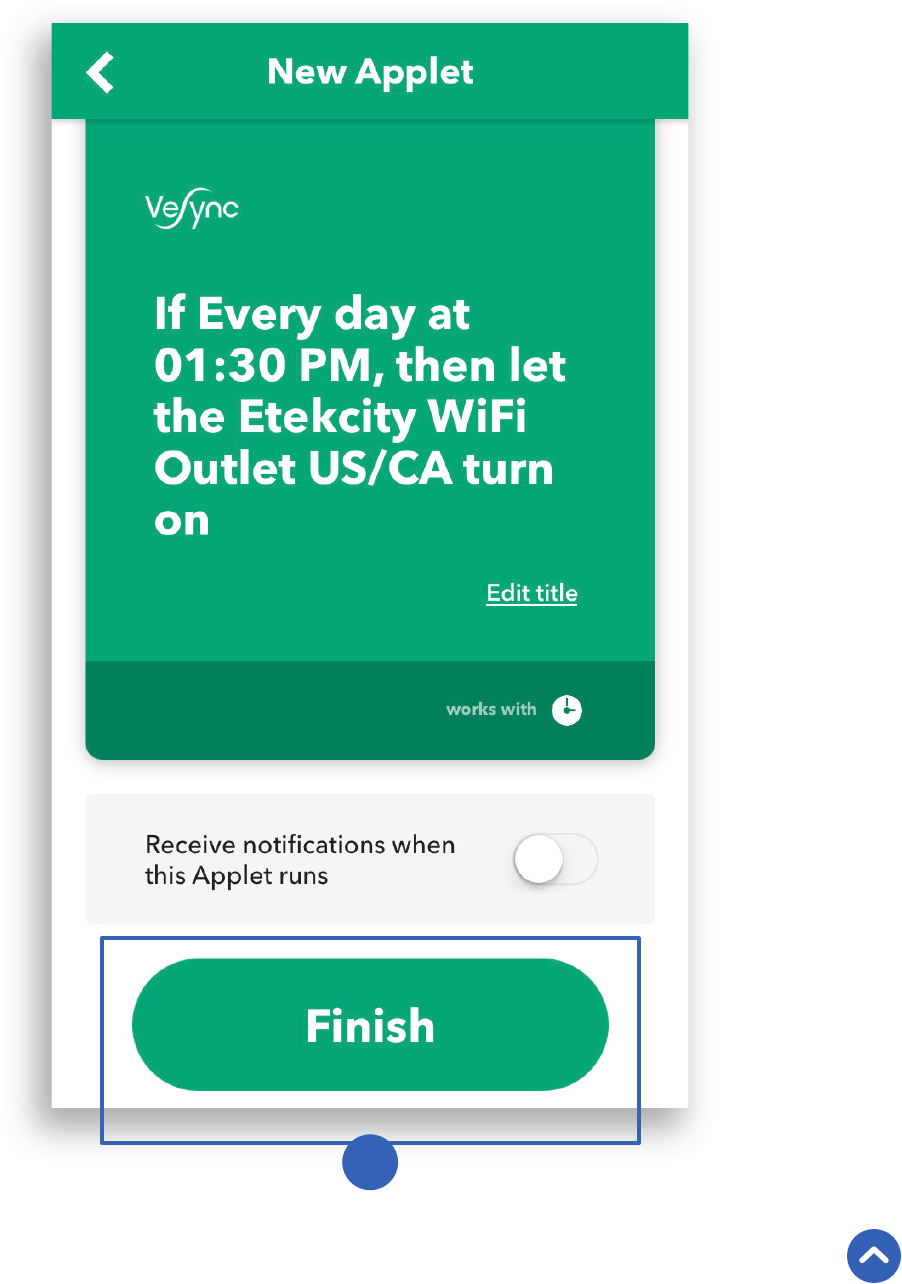
7. Tap Finish . You’ve created your own custom applet!
Back to Table of Contents

Maintaining Your Smart Outlet
Firmware Updates
Factory Reset
To keep the smart outlet up-to-date with the latest
improvements and xes, you should always update the
rmware when available.
On the Device Settings screen, tap Upgrade Firmware .
Factory resetting the smart outlet can help you
troubleshoot any issues you may have. Please keep in
mind that factory resetting a device will erase all of your
custom settings and restore the factory default settings.
Press and hold the power button for about 20 seconds
until the light indicator blinks blue rapidly then turns off.
Back to Table of Contents
Troubleshooting
Q: Why aren’t my outlets connecting?
• During the setup process, you must be on a 2.4GHz WiFi network.
• Make sure the WiFi password you entered is correct.
• Be sure the LED light on the outlet matches the method of setup
(see Light Indication Chart , page 7).
• Try moving your router closer to your outlet (164 ft / 50 m visible
range is best).
• Make sure you don’t have too many devices connected to your
router (10 or fewer is best).
• Close and reopen the VeSync app.
• Clear your VeSync app cache.
• Factory reset your smart outlet (see Factory Reset , page 50).
Q: How do I change my WiFi network to a 2.4GHz WiFi network?
• Most dual-band routers support both 2.4G and 5G networks. Select
the WiFi name that does not end in “_5G”.
• If your phone is attempting to connect to the 5G network, try
“forgetting” or temporarily disabling the 5G network.
• If you are unsure, or if the 2.4G and 5G networks do not have
separate names, please contact your internet service provider.
Q: I already have another outlet connected. Why won’t this outlet
• Close and relaunch the VeSync app, then reset the outlet that is
not connecting.
• Use APN Mode to set up the outlet (see page 13).
Q: I’m using APN Mode, but can’t nd the “ESP” access point.
• Press and hold the power button on the outlet for 10-14 seconds to
trigger APN Mode. The “ESP” access point will appear in your list
of available WiFi connections.
• During APN Mode, the LED light on the outlet will slowly blink blue.
You will have 5 minutes to pair the outlet with your phone.
Q: My outlet is ofine.
• Delete the ofine outlet from the VeSync app. Swipe left (iOS) or
tap and hold (Android), and tap Delete .
• Hard reset the outlet by pressing and holding the power button for
more than 20 seconds. The LED light will blink rapidly and turn off.
• Once the outlet has been deleted and reset, recongure your
outlet with the VeSync app.
Note: P ow er out ages or changing W iFi r outer s may c ause y our outle ts t o
go of fline .
Q: Why won’t the VeSync app let me add my smart outlet?
• If the smart outlet is already added to another person’s VeSync
app, ask them to share the smart outlet with you (see Share
Your Smart Outlet , page 35) so that you can control it with your
VeSync account.
• Be sure your WiFi password is entered correctly.
• Use APN Mode (page 13).
• Make sure your smart outlet rmware is up to date (see Firmware
Updates , page 50).
• Factory reset your smart outlet (see Factory Reset , page 50).
Q: After adding my smart outlet to VeSync, why won’t the smart
outlet icon appear on the “My Home” screen of the VeSync app?
• After adding your smart outlet to the VeSync app (see VeSync
App Setup , page 8), refresh the main menu screen by closing and
reopening the app.
Q: Alexa or Google Home can’t nd my app or can’t discover my
smart outlet.
• Make sure your wireless network router is close enough to your
smart outlet. The smart outlet must be within a 164 ft (50 m)
visible range from the router.
• Check that your Alexa or Google Home is working properly.
Q: Why isn’t my smart outlet turning on/off as scheduled?
• Make sure that the schedule is still turned on. The toggle switch
should look like , not .
• Make sure that your phone’s Location Services are turned on.
• Make sure the smart outlet is connected to a working network and
is not ofine.
Q: I believe my smart outlet is defective. What should I do?
• Contact Customer Support (page 56).
Back to Table of Contents
Warranty Information
Terms & Policy
Etekcity warrants all products to be of the highest quality in material,
craftsmanship, and service, effective from the date of purchase to the
end of the warranty period.
Etekcity will replace any product found to be defective due to
manufacturer aws based on eligibility. Refunds are available within
the rst 30 days of purchase. Refunds are only available to the original
purchaser of the product. This warranty extends only to personal use
and does not extend to any product that has been used for commercial,
rental, or any other use in which the product is not intended for. There
are no warranties other than the warranties expressly set forth with each
This warranty is non-transferrable. Etekcity is not responsible in any way
for any damages, losses, or inconveniences caused by equipment failure
by user negligence, abuse, or use noncompliant with the user manual or
any additional safety, use, or warnings included in the product packaging
and manual.
This warranty does not apply to the following:
• Damage due to abuse, accident, alteration, misuse, tampering, or
• Improper or inadequate maintenance.
• Damage in return transit.
• Unsupervised use by children under 18 years of age.
Etekcity and its subsidiaries assume no liability for damage caused by
the use of the product other than for its intended use or as instructed in
the user manual. Some states do not allow this exclusion or limitation of
incidental or consequential losses so the foregoing disclaimer may not
apply to you. This warranty gives you specic legal rights and you may
also have other rights which may vary from state to state.

ALL EXPRESSED AND IMPLIED WARRANTIES, INCLUDING THE
WARRANTY OF MERCHANTABILITY, ARE LIMITED TO THE PERIOD
OF THE LIMITED WARRANTY.
Additional 1-Year Warranty
You can extend your 1-year warranty by an additional year. Log onto
www.etekcity.com/warranty and enter your order number (for example,
from Amazon or Houzz) to register your new product for the extended
If you are unable to provide the order number for your product, please
type a short note in the order number eld along with the date you
received your product.
Defective Products & Returns
If your product proves defective within the specied warranty period,
please contact Customer Support via support@etekcity.com with your
order number. DO NOT dispose of your product before contacting us.
Once Customer Support has approved your request, please return the
unit with a copy of the invoice or your order number.
Back to Table of Contents